**THIS THREAD IS A WORK IN PROGRESS.**
If you stumbled across this thread and you're unfamiliar with the Corbin S Press or don't know what swaging is, listen to Dave Corbin explain the basics of bullet swaging and swaging airgun slugs.
Also take some time to click some links below.
Air Gun Pellet (Slug) Swaging Information
 www.corbins.com
Corbin Press Info http://bulletswage.com/csp-1.htm
Corbin S Press Airgun Slug Kit (package deal) https://www.corbins.com/shop/s-press-airgun-slug-kit-press-die-slicer-lead-lube-1578?page=5#attr=702

Now on to the business.....First off I'd like to apologize for not recording myself setting up my Corbin S press from scratch because I haven't seen that video yet using the bench stand. In fact, I have watched several videos online and I have searched the Corbin sites. The new site has yet to compile and transfer resources form the old site as seen below. I think this will be updated in time.

Much of what's on the old site is, well it's old. What I found was the same video from the 1990s that’s included on a DVD that comes with the S Press that starts with an already assembled and setup press that doesn't look like the current S Press currently being sold in 2024. It also does not show enough detail about how to use the die sets for making airgun projectiles. Instead it focuses on making jacketed bullets. It then goes into using the more complex H Press. Here is a link to that video via the old Corbin site http://bulletswage.com/howto.htm
As a result, I have determined that updated videos and more thorough instructions are needed. I may have missed something, but from my observation the information that is readily available seems better suited for people who already have some sort of background in bullet making or reloading.
Edited to add video: 08/15/24
Excellent hollow-point and hollow-ogive slug making video by the folks at Corbin shared with me by @Long_Shot. Good demo of using different dies & punches.
Other resources currently available on the new Corbin site:

 www.corbins.com
www.corbins.com
I wanted to start this thread for the complete novice and those of you who may be new to the concept of swaging projectiles. Swaging is simply a method of using mechanical leverage to create extreme pressure in order to cold flow (mold) solid lead into a precision formed projectile. This is done by placing a solid piece of lead (a core) into finely machined die that contains the lead as it is forced into the precise internal dimensions or shape of the die. Dies function in conjunction with punches. These punches form the ends of the projectile (the base and the nose or tip) and contain the lead so that it remains in the die. There are tiny holes in the Corbin dies that allow any excess lead to bleed off (the excess lead from the bleed off is called “sprue”) making it possible to repeatably press projectiles that are very close to the exact same weight. This definition is my own and the description of the swaging process is how I understand it. Feel free to correct me if I've erred. Here is how the folks at Corbin explain swaging https://www.corbins.com/blog/swaging-101-1/what-is-bullet-swaging-5
I'm not a tradesman and I am not naturally mechanically inclined or handy. I can do very basic things with tools, so if you're anything like me, this thread is for you. For current owners and those with more advanced knowledge this is an opportunity to share your videos, knowledge, and expertise with others. At least three of you have been very helpful in making yourselves available to assist me and I thank you all. One person has been @Ca_Varminter. He has been extremely helpful to me with understanding the setup. He has also been helpful in other areas of air gunning as well. @nielsenammo was very helpful to me early on when I was still trying to figure out which press to buy and how to approach swaging. Nick’s candor has been very helpful and very much appreciated. Now they sell lead wire for airgunners just to help us out. Another extremely helpful member has been @CBuasri . He's checked in on me to see if I've had any difficulties or needed assistance. These folks are among the great members of our airgun community.
I started looking into to swaging about 3 years ago because during the pandemic strange things occurred logistically with products and material that caused delays in delivering projectiles to their markets. Although I managed to maneuver around most of what people thought were shortages, I wanted to be able to make what I wanted, how I wanted it, when I wanted it. I also looked into casting, but once I found a projectile that my gun liked, I wanted to be able to make my own and to have a process with excellent consistency. My first PCP was a big-bore Benjamin Bulldog .357, so eventually I'd have arrived at the point of making my own projectiles. At some point I bought a used modified Bulldog from a fellow member and with the gun came some advice on a projectile that it shot well. Not only did the modified Bulldog shoot the projectile well, every Bulldog I shot was able to shoot the same projectile well. At that point I decided it's time that I learn to make my own. Then the search for the right setup began. You can search the AGN threads for posts, threads, and conversations about that.
Here's a photo of my S Press just after setting it up.

Photos of how my dies and punches are currently stored after cleaning and oiling


Here's the new Corbin video on how to set up the S Press.
In setting up my press I encountered several obstacles -
1) I wanted a dedicated workspace for swaging, so I bought a workbench just for making projectiles. The first problem was that it arrived with a busted wooden top. Thanks to @Rob_in_NC I was able to mend it, well sort of. I didn't know what I was doing, asked for his advice, watched a few videos on YouTube, bought a couple of clamps, and winged it with wood glue. I won't bore you with all of those photos, but it worked well enough. The top had 3 cracks, 1 was over 12" in length and broke all the way through this inch thick piece of pressed wood.

My half-hearted and haphazard attempt to mend the break.

It mended well enough to use and the company refunded my money so the workbench was free.
2) The next issue was to wait for my bench stand to arrive. I ordered it thinking they were in stock. When I ordered my press they were not and I was not given a specific timeframe when they would have more. I was told they'd have to make more. When I placed a second order I saw them listed and assumed they were back in stock. After ordering I found out that they were not. I told Kelly not to worry I'd like all of my items to ship together. He gave me a two week timeframe and my bench stand was finished and shipped within that timeframe.
3) Once the stand arrived, my next issue was the metal frame beneath the wooden workbench top. I had not anticipated the metal table frame interfering with the press installation . I did not want to drill through it and I found that you want this press close enough to the edge of the table so that the lever's range of motion is not obstructed and you can fully utilize the leverage of the cam action, but not so close that it will eventually crack the edge of the table top with repetitious torquing.
Here are some photos of the metal close to the edge from beneath the workbench tabletop.


So my dilemma was the question of "how do I avoid drilling through metal while allowing the lever enough room to go through its full range of motion?" I posed this question to Corbin Manufacturing and via email received no response. I ended up coming up with a decent solution. At first I thought this placement might work since the metal frame is not as wide beneath the short edge of the table.

However, this does not leave enough room for the lever to go all the way down. I thought the height of the stand would make a difference, but it only affords you about 12". This height saves table space and makes swaging while standing more comfortable.
I finally decided to situate the bolts on the front of the bench stand on one side of the metal table frame and the other behind it. The end result afforded me enough space from the edge to where I don't think the stress of pulling the press handle down repeatedly will break the wood at the edge off the table over time. The downside is that my placement is very close to the metal frame towards the edge. So close that I needed an adjustable crescent wrench to hold the nut below the table top because a socket cannot fit over the nut. But hey, it worked out. To install a bench stand you must supply your own bolts. I used four 1 ¼" long, 5/16-18 bolts. I also bought some 1 ½" and 2" long bolts of the same size. Ideally I would think 1 ½" are best if you don't have anything obstructing you from tightening the nuts.

4) The next issue I encountered was rust on one of my punches. My press sat in the box for a while until the additional components that I ordered arrived, I got my table setup, and I made time to setup my press. I did not want to drill holes to mount the press before the bench stand arrived to only have remove it and drill different holes in workbench to mount it leaving holes in my tabletop. When I finally went through all of my dies and punches I noticed rust on a base punch. I contacted Corbin via email about this (including the photo below) explaining that when I noticed this, I tried removing the rust with steel wool, but it didn't seem to work well. I was also concerned about using steel wool close to the polished surface. So I asked what they suggested that I do. In response I was told "light steel wool will remove it easily and keeping a little bit of swage lube on it when stored will help." I'd already tried steel wool and it didn't remove it easily. I don't know who replied via email, there was no signature or name used. Before I received a response I had oiled all of my dies and this punch with Ballistol until I can find something better to use. I got that from a document published on the old Corbin site about caring for the dies. I will probably call them later today to get a more satisfactory answer. This is not me throwing anyone under the bus. I'm communicating to you all issues that I have encountered so far on my journey.
Here's the rusty punch before using steel wool on it. I'll add a photo of the after when I take it out again. It's been oiled and stowed for now. I still have not used it.

Here is a photo taken after my initial steel wool treatment.

I sent the photo to Corbin via email and Kelly responded. In his reply he told me that it looks ok, but I can also use a fine grit sandpaper (600 grit) to clean it up a bit more. My only concern about that is making sure that I remove all granules and debris before using this punch and being careful not to scratch the polished surface considering that the rust reached the border area of the different surfaces of the punch. You may wonder, how did this rust occur? We’ve had severe weather that knocked out our power a few times this summer. A couple of tornadoes came through last month and knocked the power out for an about four days. No a/c and high humidity would be the only thing I can think of that could cause this sort of thing. I hadn’t thought about oiling my punches before I made time to set up my press. Something to think about if you live in a humid climate and/or you don't intend to set your press up immediately upon arrival.
I'll be editing and adding to this thread periodically, but I'd like to begin compiling good information as I find it.
Here's a video on "Core Making" (*I do not recommend using shot to make cores. I think it's best to use a solid piece of molded or extruded pure lead wire.)
If you stumbled across this thread and you're unfamiliar with the Corbin S Press or don't know what swaging is, listen to Dave Corbin explain the basics of bullet swaging and swaging airgun slugs.
Also take some time to click some links below.
Air Gun Pellet (Slug) Swaging Information
About Corbin Air Gun Slug Swaging
www.corbins.com Corbin Press Info http://bulletswage.com/csp-1.htm
Corbin S Press Airgun Slug Kit (package deal) https://www.corbins.com/shop/s-press-airgun-slug-kit-press-die-slicer-lead-lube-1578?page=5#attr=702
Corbin S Press Diagram:
I'm still working out the correct labels, so bear with me. I'll get it together. Thank you @Feinwerk for your example and assistance on how to label photos.Now on to the business.....First off I'd like to apologize for not recording myself setting up my Corbin S press from scratch because I haven't seen that video yet using the bench stand. In fact, I have watched several videos online and I have searched the Corbin sites. The new site has yet to compile and transfer resources form the old site as seen below. I think this will be updated in time.
Much of what's on the old site is, well it's old. What I found was the same video from the 1990s that’s included on a DVD that comes with the S Press that starts with an already assembled and setup press that doesn't look like the current S Press currently being sold in 2024. It also does not show enough detail about how to use the die sets for making airgun projectiles. Instead it focuses on making jacketed bullets. It then goes into using the more complex H Press. Here is a link to that video via the old Corbin site http://bulletswage.com/howto.htm
As a result, I have determined that updated videos and more thorough instructions are needed. I may have missed something, but from my observation the information that is readily available seems better suited for people who already have some sort of background in bullet making or reloading.
Edited to add video: 08/15/24
Excellent hollow-point and hollow-ogive slug making video by the folks at Corbin shared with me by @Long_Shot. Good demo of using different dies & punches.
Other resources currently available on the new Corbin site:
Swaging 101 | Corbins
www.corbins.com Resources | Corbins
www.corbins.com I wanted to start this thread for the complete novice and those of you who may be new to the concept of swaging projectiles. Swaging is simply a method of using mechanical leverage to create extreme pressure in order to cold flow (mold) solid lead into a precision formed projectile. This is done by placing a solid piece of lead (a core) into finely machined die that contains the lead as it is forced into the precise internal dimensions or shape of the die. Dies function in conjunction with punches. These punches form the ends of the projectile (the base and the nose or tip) and contain the lead so that it remains in the die. There are tiny holes in the Corbin dies that allow any excess lead to bleed off (the excess lead from the bleed off is called “sprue”) making it possible to repeatably press projectiles that are very close to the exact same weight. This definition is my own and the description of the swaging process is how I understand it. Feel free to correct me if I've erred. Here is how the folks at Corbin explain swaging https://www.corbins.com/blog/swaging-101-1/what-is-bullet-swaging-5
I'm not a tradesman and I am not naturally mechanically inclined or handy. I can do very basic things with tools, so if you're anything like me, this thread is for you. For current owners and those with more advanced knowledge this is an opportunity to share your videos, knowledge, and expertise with others. At least three of you have been very helpful in making yourselves available to assist me and I thank you all. One person has been @Ca_Varminter. He has been extremely helpful to me with understanding the setup. He has also been helpful in other areas of air gunning as well. @nielsenammo was very helpful to me early on when I was still trying to figure out which press to buy and how to approach swaging. Nick’s candor has been very helpful and very much appreciated. Now they sell lead wire for airgunners just to help us out. Another extremely helpful member has been @CBuasri . He's checked in on me to see if I've had any difficulties or needed assistance. These folks are among the great members of our airgun community.
I started looking into to swaging about 3 years ago because during the pandemic strange things occurred logistically with products and material that caused delays in delivering projectiles to their markets. Although I managed to maneuver around most of what people thought were shortages, I wanted to be able to make what I wanted, how I wanted it, when I wanted it. I also looked into casting, but once I found a projectile that my gun liked, I wanted to be able to make my own and to have a process with excellent consistency. My first PCP was a big-bore Benjamin Bulldog .357, so eventually I'd have arrived at the point of making my own projectiles. At some point I bought a used modified Bulldog from a fellow member and with the gun came some advice on a projectile that it shot well. Not only did the modified Bulldog shoot the projectile well, every Bulldog I shot was able to shoot the same projectile well. At that point I decided it's time that I learn to make my own. Then the search for the right setup began. You can search the AGN threads for posts, threads, and conversations about that.
Here's a photo of my S Press just after setting it up.
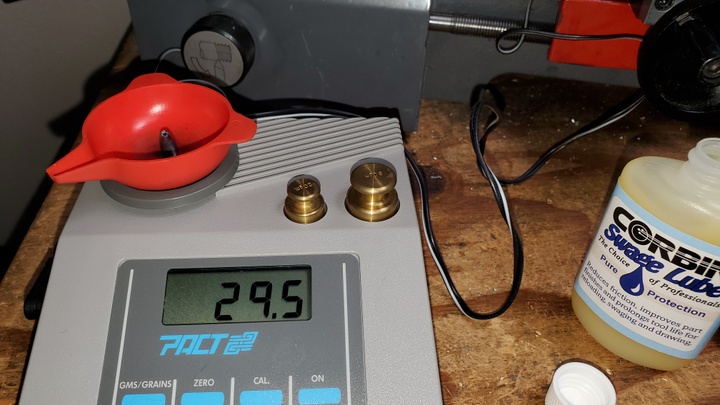
Photos of how my dies and punches are currently stored after cleaning and oiling
Setting Up Your Corbin S Press:
Here's the new Corbin video on how to set up the S Press.
In setting up my press I encountered several obstacles -
1) I wanted a dedicated workspace for swaging, so I bought a workbench just for making projectiles. The first problem was that it arrived with a busted wooden top. Thanks to @Rob_in_NC I was able to mend it, well sort of. I didn't know what I was doing, asked for his advice, watched a few videos on YouTube, bought a couple of clamps, and winged it with wood glue. I won't bore you with all of those photos, but it worked well enough. The top had 3 cracks, 1 was over 12" in length and broke all the way through this inch thick piece of pressed wood.
My half-hearted and haphazard attempt to mend the break.
It mended well enough to use and the company refunded my money so the workbench was free.
2) The next issue was to wait for my bench stand to arrive. I ordered it thinking they were in stock. When I ordered my press they were not and I was not given a specific timeframe when they would have more. I was told they'd have to make more. When I placed a second order I saw them listed and assumed they were back in stock. After ordering I found out that they were not. I told Kelly not to worry I'd like all of my items to ship together. He gave me a two week timeframe and my bench stand was finished and shipped within that timeframe.
3) Once the stand arrived, my next issue was the metal frame beneath the wooden workbench top. I had not anticipated the metal table frame interfering with the press installation . I did not want to drill through it and I found that you want this press close enough to the edge of the table so that the lever's range of motion is not obstructed and you can fully utilize the leverage of the cam action, but not so close that it will eventually crack the edge of the table top with repetitious torquing.
Here are some photos of the metal close to the edge from beneath the workbench tabletop.
So my dilemma was the question of "how do I avoid drilling through metal while allowing the lever enough room to go through its full range of motion?" I posed this question to Corbin Manufacturing and via email received no response. I ended up coming up with a decent solution. At first I thought this placement might work since the metal frame is not as wide beneath the short edge of the table.
However, this does not leave enough room for the lever to go all the way down. I thought the height of the stand would make a difference, but it only affords you about 12". This height saves table space and makes swaging while standing more comfortable.
I finally decided to situate the bolts on the front of the bench stand on one side of the metal table frame and the other behind it. The end result afforded me enough space from the edge to where I don't think the stress of pulling the press handle down repeatedly will break the wood at the edge off the table over time. The downside is that my placement is very close to the metal frame towards the edge. So close that I needed an adjustable crescent wrench to hold the nut below the table top because a socket cannot fit over the nut. But hey, it worked out. To install a bench stand you must supply your own bolts. I used four 1 ¼" long, 5/16-18 bolts. I also bought some 1 ½" and 2" long bolts of the same size. Ideally I would think 1 ½" are best if you don't have anything obstructing you from tightening the nuts.
4) The next issue I encountered was rust on one of my punches. My press sat in the box for a while until the additional components that I ordered arrived, I got my table setup, and I made time to setup my press. I did not want to drill holes to mount the press before the bench stand arrived to only have remove it and drill different holes in workbench to mount it leaving holes in my tabletop. When I finally went through all of my dies and punches I noticed rust on a base punch. I contacted Corbin via email about this (including the photo below) explaining that when I noticed this, I tried removing the rust with steel wool, but it didn't seem to work well. I was also concerned about using steel wool close to the polished surface. So I asked what they suggested that I do. In response I was told "light steel wool will remove it easily and keeping a little bit of swage lube on it when stored will help." I'd already tried steel wool and it didn't remove it easily. I don't know who replied via email, there was no signature or name used. Before I received a response I had oiled all of my dies and this punch with Ballistol until I can find something better to use. I got that from a document published on the old Corbin site about caring for the dies. I will probably call them later today to get a more satisfactory answer. This is not me throwing anyone under the bus. I'm communicating to you all issues that I have encountered so far on my journey.
Here's the rusty punch before using steel wool on it. I'll add a photo of the after when I take it out again. It's been oiled and stowed for now. I still have not used it.
Here is a photo taken after my initial steel wool treatment.
I sent the photo to Corbin via email and Kelly responded. In his reply he told me that it looks ok, but I can also use a fine grit sandpaper (600 grit) to clean it up a bit more. My only concern about that is making sure that I remove all granules and debris before using this punch and being careful not to scratch the polished surface considering that the rust reached the border area of the different surfaces of the punch. You may wonder, how did this rust occur? We’ve had severe weather that knocked out our power a few times this summer. A couple of tornadoes came through last month and knocked the power out for an about four days. No a/c and high humidity would be the only thing I can think of that could cause this sort of thing. I hadn’t thought about oiling my punches before I made time to set up my press. Something to think about if you live in a humid climate and/or you don't intend to set your press up immediately upon arrival.
I'll be editing and adding to this thread periodically, but I'd like to begin compiling good information as I find it.
Here's a video on "Core Making" (*I do not recommend using shot to make cores. I think it's best to use a solid piece of molded or extruded pure lead wire.)
Last edited: