Huben Any issues or problems with Huben gk1 please share your experience

It appears I have been corrected….again.

Admittedly, I don’t notice the indentation in hand. One must admit however, it is nominal and is concentrated in the center of the star washer where the pressure is amplified by the design of the washer. There is no indication that the major od of the star washer is making contact. It obviously has not created a groove anywhere near the magnitude of the groove cut in the failed valve. Take from that what you will.

I have the materials and capability to produce a different designed closing valve….at this point I’m not convinced there is a need.

Dave

The larger the OD of the seat, the deeper the indentation would be, which is why one of my proposed fixes was to reduce the seat diameter, to prevent the outer flange from taking a beating and flexing.

@toshiba_trt explained his washer was sort of a cup style, which explains not only the potentially larger OD of the indentation, but its severity.

I'm just spitballing theories here from my observations.

-Matt
 
Last edited:
So a wider washer like this is a good idea or not? Washer is in green. Just a rough sketch up. In this sketch the washer is only 0.5mm thick, which isn't much. Part isn't to scale, or remotely accurate, as I don't have any measurements, nor did I spend much time drawing this.
gk1closevalvewag.jpg
 
Green good, red bad. Energy transfer absorbed by entire body vs flange.

View attachment 498537
Thanks. I understand the basic reasoning. How close to the narrowest OD of the part can you go? Seems that one could match the OD of the washer to the narrowest OD of the plastic, like:
gk1closevalvewag_smallerODwasher.jpg

Or should one make the washer smaller in OD? I'm trying to learn these "rules of thumb". I'm sure there's a structural mechanical analysis way of determining this, but was wondering if some general rules might apply (in most cases).
 
  • Like
Reactions: Stubbers
Distributing the force over a larger diameter vs a smaller diameter should yield less psi at the contact point, causing less of a gouge. I’m only discussing the gouge. Yes, a larger diameter would place more stress on the outer edge of the flange, I’m not denying that. But that doesn’t explain the gouge being much deeper than mine, which has the same force concentrated in a much smaller area (mine). Mine should be gouged to hades by now.

Dave
 
  • Like
Reactions: WobblyHand
Distributing the force over a larger diameter vs a smaller diameter should yield less psi at the contact point, causing less of a gouge. I’m only discussing the gouge. Yes, a larger diameter would place more stress on the outer edge of the flange, I’m not denying that. But that doesn’t explain the gouge being much deeper than mine, which has the same force concentrated in a much smaller area (mine). Mine should be gouged to hades by now.

Dave

That partly depends on the washers edge, and toshiba mentioned his was cupped. A sharp cup vs a non- sharp uncupped edge will have a drastic difference.

The indentation depth / wear is not what is of concern here, its the fracture for crying out loud...lol...so the location of the indention is of concern, not its presence or depth.

-Matt
 
Last edited:
  • Like
Reactions: WobblyHand
Having a flat washer spreads the seating force across the flat surface, having it cup has it spread across the surface area equal to the knife edge of the cup. Putting that force on the outer edge of the flange is what caused this failure, by both weakening the flange integrity and spreading the forces to the outer edges of the flange.

So given a cupped washer, you'd still want the force to be concentrated to transfer to the whole body reducing flange flex. Given a flat washer, sure, you want it to be a larger OD to spread the force across the entire surface area of the washer...

-Matt
 
That partly depends on the washers edge, and toshiba mentioned his was cupped. A sharp cup vs a non- sharp uncupped edge will have a drastic difference.

The indentation / wear is not what is of concern here, its the fracture for crying out loud...lol...so the location of the indention is of concern, not its presence or depth.

-Matt
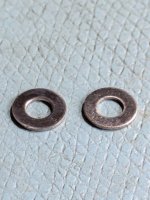
Most washers are formed by stamping and they most definitely have a rounded side and a sharp side, at least in the small sizes that I have seen. For an application like this, it would matter. I'd put the sharp side opposite the plastic, since that sharp edge is concentrating stress in a very narrow area. Sorry this is not the best example, but I just took out two M3 washers, the one on the left is sharp side up, on the right is smooth side up. These washers were sourced at McMaster (via Taiwan) so they don't represent the bottom of the pile... I've seen far, far worse. Wish the photo was more obvious, but best I can do with a hand held phone.
PXL_20240923_145106888.jpg
One could fix the issue by lightly sanding the sharp side to remove the bur and radiusing the outer sharp edge somehow. Or easier, just flip it over.

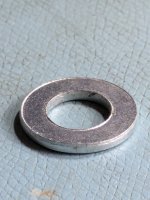
Here's a larger washer showing the issue more obviously. (about a 3/8" ID washer). Raised bur on the OD and ID of one side.
PXL_20240923_150246994.jpg
 
Last edited:
  • Like
Reactions: Stubbers
Most washers are formed by stamping and they most definitely have a rounded side and a sharp side, at least in the small sizes that I have seen. For an application like this, it would matter. I'd put the sharp side opposite the plastic, since that sharp edge is concentrating stress in a very narrow area. Sorry this is not the best example, but I just took out two M3 washers, the one on the left is sharp side up, on the right is smooth side up. These washers were sourced at McMaster (via Taiwan) so they don't represent the bottom of the pile... I've seen far, far worse. Wish the photo was more obvious, but best I can do with a hand held phone.
View attachment 498551
One could fix the issue by lightly sanding the sharp side to remove the bur and radiusing the outer sharp edge somehow. Or easier, just flip it over.

Here's a larger washer showing the issue more obviously. (about a 3/8" ID washer). Raised bur on the OD and ID of one side.
View attachment 498590

I very much agree, toshiba referred to his as a belleville which suggests quite the cupping/sharp edge. If the washer were perfectly or near perfectly flat in his, I highly doubt we'd be having this discussion. But being cupped AND towards the outside of the flange...here we are.

100% design induced failure and not a user error induced failure, even if it were 'adjusted out of spec'...this failure can be avoided by the methods discussed so far imo. Tapered flange versus 90 degree, flat washer, cupped washer with force concentrated off the flange...ect. All these proposals made would reduce the presence of flange integrity being compromised (indentation at a poor location), as well as reduce flange flex and the potential of micro-fracturing to occur which will grow indefinitely until fail.

-Matt
 
Last edited:
At least in the booklet I have, there's no washer shown in the parts breakdown, especially between parts 20 and 21. I have a V3. So was that installed at factory, and improperly documented, or done by the dealer, or the OP? This is not to establish blame, but to try to figure out how it happened. Find it hard to believe that the factory would put in a Belleville washer there, but hey weird things happen on the factory floor. It wouldn't show up at final test (if there is one) only later in the hands of the customer.
 
Last edited:
I very much agree, toshiba referred to his as a belleville which suggests quite the cupping/sharp edge. If the washer were perfectly or near perfectly flat in his, I highly doubt we'd be having this discussion. But being cupped AND towards the outside of the flange...here we are.

100% design induced failure and not a user error induced failure, even if it were 'adjusted out of spec'...this failure can be avoided by the methods discussed so far imo. Tapered flange versus 90 degree, flat washer, cupped washer with force concentrated off the flange...ect. All these proposals made would reduce the presence of flange integrity being compromised (indentation at a poor location), as well as reduce flange flex and the potential of micro-fracturing to occur which will grow indefinitely until fail.

-Matt
The belleville washer is not shown in the V3. There is no washer shown at all in between the stem and the plastic piece. Not sure this is incomplete documentation, or earlier versions had something, or a dealer did to fix a different problem, or due to some other cause/person. As you well know, some fixes can cause a host of other issues, since they may not have been thought through at a systemic level.
 
The belleville washer is not shown in the V3. There is no washer shown at all in between the stem and the plastic piece. Not sure this is incomplete documentation, or earlier versions had something, or a dealer did to fix a different problem, or due to some other cause/person. As you well know, some fixes can cause a host of other issues, since they may not have been thought through at a systemic level.
Have you opened your V3 up and looked for it? Well mine has it and so does Gregor Kamensek's. He displays all parts on the V3 model. Yes, the washer isn't documented. It's questionable why they put it in there. Also the washer's flat side has a rough stamped surface. Perhaps to have better contact to the metal stem and prevent from rotating und high pressure and cutting into the plastic.
I'm gonna smooth out the edge of that washer but will reinstall it. It belongs in there for some purpose. This is the first reported incident and so many V3 owners never seem to bother with it. So I think the system actually works.

Marauder valve seats run a quite a sharp knife edge, which causes excessive wear on the poppet, similar to what your closing valve experiences. Most tuners smooth that knife edge down to reduce this wear factor by a large margin, which results in reduced indentation. Smoothing down your washers knife edge is a great approach. That doesn't mean the design doesn't have faults and cannot be improved upon by other means, or else the one incident wouldn't have occurred... Ounce of prevention is worth a pound of cure. A simple taper on the flange opposed to 90 degree for example would reduce flex flange, ect ect...but the simple approach of sanding down that knife edge may eliminate the potential of failure.

-Matt
 
Have you opened your V3 up and looked for it? Well mine has it and so does Gregor Kamensek's. He displays all parts on the V3 model. Yes, the washer isn't documented. It's questionable why they put it in there. Also the washer's flat side has a rough stamped surface. Perhaps to have better contact to the metal stem and prevent from rotating und high pressure and cutting into the plastic.
I'm gonna smooth out the edge of that washer but will reinstall it. It belongs in there for some purpose. This is the first reported incident and so many V3 owners never seem to bother with it. So I think the system actually works.
Not yet. Probably won't until I need to take it apart for something. The way things have been going lately for me, I'm not tempting fate. It's definitely not the first time that a parts breakdown is incomplete or wrong. So I don't doubt that's what you have (or what I unknowingly have).

I could see why there's a rough surface, but having a sharp edge and a belleville like shape, or even the sharp edges of a washer, that introduces stress risers that just don't need to be there. Even rocks break under the sharp point and blows of a hammer, why wouldn't plastic?
 
  • Like
Reactions: Stubbers
So today the new closing valve arrived. Immediately went to test with disappointing results. The pistol is only putting out around 47 ft lbs. I've checked the springs and the shooting valve. All good. But there's a big change on that closing valve. It has different grooves that are most likely responsible for the lack of power. Let's see what the guys from Huben have to say next week. They're not available on the weekend.

IMG_20240927_151821.jpg
 
So today the new closing valve arrived. Immediately went to test with disappointing results. The pistol is only putting out around 47 ft lbs. I've checked the springs and the shooting valve. All good. But there's a big change on that closing valve. It has different grooves that are most likely responsible for the lack of power. Let's see what the guys from Huben have to say next week. They're not available on the weekend.


It's as if they're throwing crap at the wall to see what sticks...what gives? CLEARLY this issue has presented itself more than what is reported here. You would be coocoo for cocoa puffs if you think all issues get reported to AGN, globally or in the US. Otherwise why so many changes between closing valves?

Frankly, I don't like that new design. Hope you get some answers.

-Matt
 
So today the new closing valve arrived. Immediately went to test with disappointing results. The pistol is only putting out around 47 ft lbs. I've checked the springs and the shooting valve. All good. But there's a big change on that closing valve. It has different grooves that are most likely responsible for the lack of power. Let's see what the guys from Huben have to say next week. They're not available on the weekend.

View attachment 499723
Can you get a rough dimension on the length of the new one vs the old one?

Are the springs in the valve in good shape? Particularly the one that stays in the receiver. The plenum pressure only acts on the stem portion and the return spring (top most) is what returns the valve back to the open position.

Also, does the stem slide freely in the new valve?

Dave

ETA: I see you checked springs
 
The od the same on both. I can't measure the length because the other is broken into pieces.

As already mentioned the new opening valve has four grooves on the bottom side (opposite from the sealing end). But I doubt that this has anything to do with the issue. But I had dry fired it a few times when the malfunction occurred and I worry that the opening valve might be damaged because it was exposed to the whole bottle pressure because the function of the closing valve wasn't given anymore. But when it's adjusted to high power it lets a lot of air out just as it's supposed to do but with no power. So the valve opens but uncertain if its operating correctly. I had it out today and I'm not sure if it's still working properly. You kinda have to use a bit of force to moventhe piston out.. Isn't it supposed to glide smoothly in and out?

Just checked out the trusty disassembling video and it shows that there is some resistance when moving the piston in and out of the opening valve.
 
Last edited:
The reason I asked if the length is the same is that they appear to want to vent that portion of the valve where the stem slides in, maybe keeping the large portion of the stem from sealing against the bottom of closing valve. Since this was done with a grooved washer in yours and a star washer in mine. Now that they have put the grooves into the closing valve itself, the venting washer may not be needed and they may have added a little bit of length to account for the (now unneeded) washer. This would decrease power if a washer was used with a longer closing valve.

This is just a guess at what I’m looking at with yours.

Dave