(all photos can be enlarged by clicking on them)
This often comes up in other discussions. I'm hoping this stand-alone post will be easier for Ghost owners to find.
As shipped, the Ghost trigger pull weight is usually in the 1lb, 8oz area, and with a rather rough "break". It can be drastically improved through lightening two springs, and then through tweaking of the trigger adjustment screws. The following process can get it down to 8ounces or less, and feel much better.
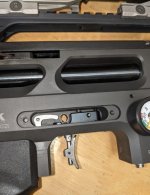
The first spring that needs lightened is easy to get to, being located above the trigger blade, and under the plate that the safety goes through. Here is the "first" spring. Essentially the first stage spring....
And what it looks like after being further disassembled...Allen key is pointing at the spring.
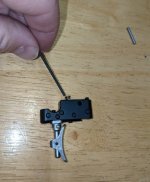
You can either reuse this spring after over compressing it with plyers to reduce its overall length (careful that it doesn't fly away) or it can be replaced with this spring...(thanks to @pesty3782 for the link) Amazon.com
The second big fix is to lighten the spring on the rear end of the trigger rod. This spring is located to the rear and underside of the gun. It's is a bit harder to get to than the first stage spring, but not impossible. Access requires "dropping" the trigger cassette.
First remove these two bolts...
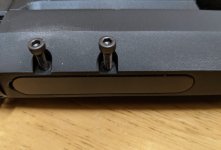
Gravity is your friend here so keep the gun in a vertical position while pulling the trigger (gun does not need cocked for this). The purpose of pulling the trigger is to relieve the tension of the hooked portion of the cassette from the brass ears threaded into the back of the trigger rod. That brass eared piece is also the spring retainer. Prying on one end of the cassette will not aid in removing it. The cassette detaches from the gun best if kept parallel to the edge of the frame it is coming out of. Don't force anything.
This is the cassette and how it "hooks" to the trigger rod.
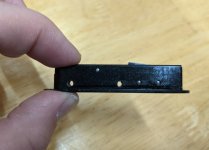
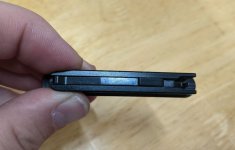
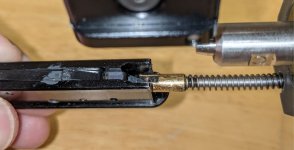
Once the trigger cassette is removed you'll have this...(don't lose the tiny rod going between the brass ears)
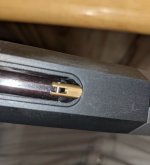
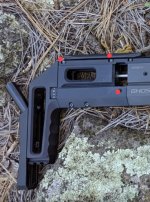
At this point it's still nearly impossible to get to the spring you're attempting to access. The entire rear subassembly comes off as one piece to facilitate this. To detach the rear sub-assembly remove four bolts and one grub screw, marked In red here. The four bolts come down from the rail, under the cheek piece. And the grub screw is tightened to a flat on the valve. Removing these four bolts and one grub screw allow the subassembly to slide out the back, as one piece.
You'll now have this (access to the trigger rod spring), and a decision to make. Remove the brass piece, or leave it in place.
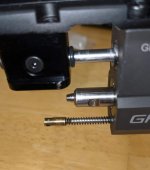
Removing the brass piece means you can swap out the spring for a lighter one. Leaving the brass piece in place means you have to carefully remove half a coil of the spring at a time, reassembling to check function and desired feel. The brass eared piece is threaded to the rod but it is retained with serious loktite. Heat is necessary. It is also tricky to get it threaded back on to the correct depth for everything to function properly.
If you choose to remove it you'll get this....
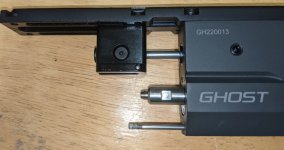
The brass piece is very easily damaged and I'd recommend leaving it in place and clipping coils over removing it and replacing the spring with a lighter one. REMEMBER that you can't reattach a too-much clipped coil. Go slow and easy. Retesting function after each half coil removed.
Clipping can be achieved with this type of wire cutter. https://www.harborfreight.com/7-in-diagonal-cutters-64573.html
It's been a year since I did mine but I vaguely remember removing about 2 full coils.
@Solo1 provided this link as a other source of lighter springs to perform the above lightening of the two springs. Amazon.com
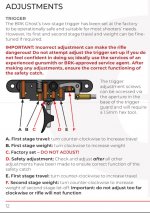
Reassemble in reverse order and then use the factory adjustments to get it how you like it.
Alternatively, and/or if the above seems daunting, send it to @zx10wall (Derrick Wall @ Tenacious Airguns) and he'll do all of the above and likely add in a few special touches. He can also tune your desired projectile to your desired speed.
This often comes up in other discussions. I'm hoping this stand-alone post will be easier for Ghost owners to find.
As shipped, the Ghost trigger pull weight is usually in the 1lb, 8oz area, and with a rather rough "break". It can be drastically improved through lightening two springs, and then through tweaking of the trigger adjustment screws. The following process can get it down to 8ounces or less, and feel much better.
The first spring that needs lightened is easy to get to, being located above the trigger blade, and under the plate that the safety goes through. Here is the "first" spring. Essentially the first stage spring....

And what it looks like after being further disassembled...Allen key is pointing at the spring.

You can either reuse this spring after over compressing it with plyers to reduce its overall length (careful that it doesn't fly away) or it can be replaced with this spring...(thanks to @pesty3782 for the link) Amazon.com
The second big fix is to lighten the spring on the rear end of the trigger rod. This spring is located to the rear and underside of the gun. It's is a bit harder to get to than the first stage spring, but not impossible. Access requires "dropping" the trigger cassette.
First remove these two bolts...

Gravity is your friend here so keep the gun in a vertical position while pulling the trigger (gun does not need cocked for this). The purpose of pulling the trigger is to relieve the tension of the hooked portion of the cassette from the brass ears threaded into the back of the trigger rod. That brass eared piece is also the spring retainer. Prying on one end of the cassette will not aid in removing it. The cassette detaches from the gun best if kept parallel to the edge of the frame it is coming out of. Don't force anything.
This is the cassette and how it "hooks" to the trigger rod.


Once the trigger cassette is removed you'll have this...(don't lose the tiny rod going between the brass ears)

At this point it's still nearly impossible to get to the spring you're attempting to access. The entire rear subassembly comes off as one piece to facilitate this. To detach the rear sub-assembly remove four bolts and one grub screw, marked In red here. The four bolts come down from the rail, under the cheek piece. And the grub screw is tightened to a flat on the valve. Removing these four bolts and one grub screw allow the subassembly to slide out the back, as one piece.

You'll now have this (access to the trigger rod spring), and a decision to make. Remove the brass piece, or leave it in place.

Removing the brass piece means you can swap out the spring for a lighter one. Leaving the brass piece in place means you have to carefully remove half a coil of the spring at a time, reassembling to check function and desired feel. The brass eared piece is threaded to the rod but it is retained with serious loktite. Heat is necessary. It is also tricky to get it threaded back on to the correct depth for everything to function properly.
If you choose to remove it you'll get this....

The brass piece is very easily damaged and I'd recommend leaving it in place and clipping coils over removing it and replacing the spring with a lighter one. REMEMBER that you can't reattach a too-much clipped coil. Go slow and easy. Retesting function after each half coil removed.
Clipping can be achieved with this type of wire cutter. https://www.harborfreight.com/7-in-diagonal-cutters-64573.html
It's been a year since I did mine but I vaguely remember removing about 2 full coils.
@Solo1 provided this link as a other source of lighter springs to perform the above lightening of the two springs. Amazon.com
Reassemble in reverse order and then use the factory adjustments to get it how you like it.

Alternatively, and/or if the above seems daunting, send it to @zx10wall (Derrick Wall @ Tenacious Airguns) and he'll do all of the above and likely add in a few special touches. He can also tune your desired projectile to your desired speed.
Last edited: