I just purchased a IZH-46M with a grip that has never been modified. I have no woodworking skills. Can I do this? What tools do I need, any tips from people that have done this?
You are using an out of date browser. It may not display this or other websites correctly.
You should upgrade or use an alternative browser.
You should upgrade or use an alternative browser.
Air Venturi Grip Shaping
- Thread starter jccams
- Start date
no tools, no skills but a need to shape the grips
tools needed sandpaper from 180 to 400 grit
a drill would be handy and drum sander for the drill and anything more than that would be too costly but a disc sanding disc for the drill could be handy also
that is about 35.00 to 50.00 in stuff
now as a IZH 46M owner the grips need to be reshaped for about all of us mine the protrusion that your index finger sits on pinches the hell out of my middle finger
so now you have the tools and you get the grips to your liking and all you have to do is refinish the grip area that is down to bare wood
but there is a problem you and i have no idea what the Russians use for a finish, is it just Poly and if so, will it match if i use that
do i strip both grip panels and the other 2 pieces and start over, well that would be my call and poly is what i would use and i would just rub it on with a clean cloth
and of course, you have to buy the poly and some solvent to clean up with
now have i seen any 46M grip that have had a Beaver work over, that would be a BIG YES
are the grips available to replace if you really screw them up sure Rink and Steve Corcoran make them for about 225.00 to 250.00 bucks no factory grips are available
so, you ask the question can you do it and the simple answer is how the hell would we know
but wood can be turned into sawdust very easily
and then again i have no idea your plans
Upvote 0
Sure !
For the cheapest way out, you'll need the following -
1 - Half round "rasp" (rough file).
2 - A fine, half round file.
3 - 100 grit sand paper.
4 - 180 grit sand paper.
5 - paint, stain, or whatever covering you decide on.
Note, no...I'm not into wood working. I build cars, steel bodied cars. Engines, transmissions, differentials, etc.
I just have the desire to tackle things that I want done, and do them. If the task is way out of my realm of doing things, then I pay someone else to complete the task.
Wood working, I figure if I mess up...there IS..."wood filler" to help fix my screw up !
I do use power tools, but it's all automotive oriented. So the hand files noted above will take longer, but...will still get the job done.
Here's one of my pistol grip modifications.


A rifle stock modifications -
An Argus 45 stock, stock.

The same stock with some changes -

The same stock, complete on the receiver -

Epoxy fill...another way of modification -

Mike
For the cheapest way out, you'll need the following -
1 - Half round "rasp" (rough file).
2 - A fine, half round file.
3 - 100 grit sand paper.
4 - 180 grit sand paper.
5 - paint, stain, or whatever covering you decide on.
Note, no...I'm not into wood working. I build cars, steel bodied cars. Engines, transmissions, differentials, etc.
I just have the desire to tackle things that I want done, and do them. If the task is way out of my realm of doing things, then I pay someone else to complete the task.
Wood working, I figure if I mess up...there IS..."wood filler" to help fix my screw up !
I do use power tools, but it's all automotive oriented. So the hand files noted above will take longer, but...will still get the job done.
Here's one of my pistol grip modifications.
A rifle stock modifications -
An Argus 45 stock, stock.
The same stock with some changes -
The same stock, complete on the receiver -
Epoxy fill...another way of modification -
Mike

Upvote 0
I used a large round rattail rasp, a half round tapered rasp sandpaper from 80 grit to 400, 180 is what I consider coarse. I did not completely strip all old finish. I blended the finish using Birchwood Casey Original oil, a version that is not as shiney ast their Tru Oil, and it blends perfectly.
Upvote 0
okay, let me say one thing here, anyone can paint wood
and if you need to paint a set IZH 46m grips you most likely screwed them up
i give up
and if you need to paint a set IZH 46m grips you most likely screwed them up
i give up
Upvote 0
Thanks to all that replied. I will continue to gather info to ensure I have what I need before starting. I'm in no big rush, will probably be a winter project. I have also contacted Steve Corcoran but he needs a min order and has no requests right now. Nice looking grips.

Upvote 0
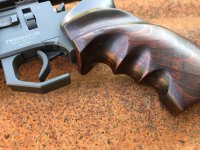
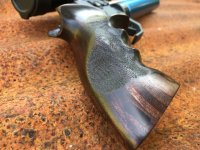
I modified mine two scallops where my fingers wrap around, and then rounded area where my trigger finger wraps around on the other side, much more comfortable I think since this picture I have made the scallops a little more pronounced, 
Upvote 0
Here's a Diana Bandit grip I did. Got a little carried away, but end result is nice.
Used a band file, dremel sanding bits. A few files/rasps, all of the sandpapers. Even used an angle grinder both to cut excess off (be mindful you will burn the wood), and use a sandpaper paddle wheel too. Being a novice, or even an expert, it's good to experiment with tools and techniques to see what works best for you.
Just go slow, and be patient.
Upvote 0
I looked at them and they are nice. I am on Steve's list so we'll see how long it takes.Rink makes some nice grips, pricy and will take about 4 to 6 weeks from Germany.
Upvote 0
i would suggest a rough file (called a half round) it will take longer to do but the results is better fitting . Power drills remove wood fast also shaped wrong unless you know how to handle the drill . and sandpaper to finishI just purchased a IZH-46M with a grip that has never been modified. I have no woodworking skills. Can I do this? What tools do I need, any tips from people that have done this?
Upvote 0
Round and flat rasp for the first step and forming the grip. Then 60 grit sand paper, followed up with 80, 120 and 400. Remember to water rise the wood a couple of times with sanding 400 in between when completed dry. Now you MIGHT start the oiling process. Many layers. At least 7. (One pr day), and LIGHT sanding/polishing between layers with 2000 grit paper. (At the end I personally use 000 steel wool soaked in oil). If you repeat the last session (000 steel wool) with one layer pr week, let’s say 2 weeks, you will have a very nice result, and ready for use.
Edit: in this example I formed an ergonomic grip to a “colt version” for my Rohm Twinmaster.

Edit: in this example I formed an ergonomic grip to a “colt version” for my Rohm Twinmaster.
Attachments
Upvote 0
Personally I did not find it necessary to go to those extremes for shaping. Round and half round rasps, a touch of 80 grit, then 120, 240 then 400 and that was fine enough. A couple of very light wipe on's of Birchwood Casey Original oil finish(a semi gloss version of tru oil) and it was ready to go the afternoon after I started in the morning. That blended and was as smooth or smoother than the original finish, Honestly I cannot tell where I worked on bare wood vs the factory finish it blended so well. I saw no need for the water application to raise grain on this beech, it was so hard that it was not necessary, if I had the seen the need for something like that I prefer to use some of my wife's spray starch, it rasises the fuz and tends to lock it in place to sand off easier plus filling open pores.
Upvote 0
Water rising before the oiling process is only necessary to prevent wood rising later on. Once you have done that, you don’t have to worry about sweating hands or moisture from rain etc.
Upvote 0
I live in the deep south and have never had that problem. I have done the water rising procedure on a couple of stocks and honestly cannot tell the difference, I tend to sand down to a very fine grit, 600 and then a good rubdown with 0000 steel wool. and sand again.Water rising before the oiling process is only necessary to prevent wood rising later on. Once you have done that, you don’t have to worry about sweating hands or moisture from rain etc.
Upvote 0