How to Use a Corbin S Press - A Thread Geared Toward Beginners

When attempting to do the lightest of slugs allowed with your die, make sure that line on the punch is above the top of the die. If you go below that, the punch face will strike the taper inside the die. Not a good thing!
Bingo... The punch will go past the bleed hole as it begins crushing into the ojive.
Most likely making the punch flash after that.
I always slowly air test to be sure nothing is going to hit. Especially since my older punches don't even have limit lines.
 
Bingo... The punch will go past the bleed hole as it begins crushing into the ojive.
Most likely making the punch flash after that.
I always slowly air test to be sure nothing is going to hit. Especially since my older punches don't even have limit lines.
@Long_Shot What do you mean by “air test” and “making the punch flash?”
 
Even then, I would use the upmost caution. You don't want those two to touch at all. A flashing can occur on the bases of your slugs if you happen to damage the face of the puch. It will reduce the OD of the punch and that's if your lucky. Worst case scenario, the die and hollow point pin would get trashed. I'm sure they express that in the manual etc.
 
Well, I shot all of the slugs from my last batch. Let’s just say this. I’ll be making more very soon. Have have a good amount of data to organize, but I’ll be sure to post a few pics here and in another thread or two. I’m satisfied with the results though.

This was the best of three groups shot tethered from 50 yards. If you’ve seen me shoot groups on paper then you know better than to expect perfection on that front, but that’s a dead animal.
IMG_5801.jpeg
 
Last edited:
20240810_111258.jpg


With all my Corbin dies...
I Always verify the clearance on my external-base forming punches..
The only one that is marked is the Flat Base(FB) Ext.Punch...

Without the Internal Punch, screw on the die.
The raise the ram and die.
Now lower the external punch to the limit mark.
Check for clearance through bleed hole with a open paper clip
If you don't feel the external punch, you are good go.

But for my unmarked Ext Base form punches..
Do the above procedure, But lower the Ext punch until the paper clip touches..
This the Maximum depth you can screw in This external Base Form Punch!!!
I Mark this with a sharpie, Measure and record the length from tip to mark.....keep for future reference...
 
Last edited:
You got some shooting in...(y) 
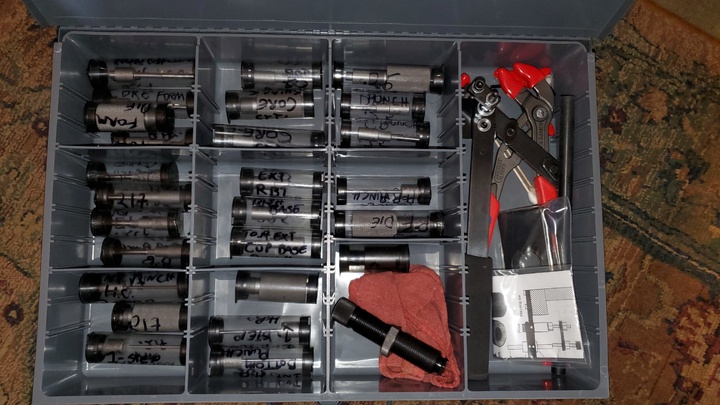
Rather rewarding to shoot slugs you make, isn't it?

"Air test" no lead. Just checking that the punch, die, and HP extractor pin don't collide.
@ Ca_Varminter - has a good explanation of how to go for the lightest weights safely.
3 years ago someone sent me this photo of what happens if you damage the punch, - bad flashing.
His punch was trash at this point.

I prefer a punch holder with the locking ring tight and the punch in it for each "die/punch set." No setting anything.
Just thread the die and the punch holder in to continue making the same slug you were the last time it was used.
1SlugFlashing.jpg
 
20240810_111258.jpg


With all my Corbin dies...
I Always verify the clearance on my external-base forming punches..
The only one that is marked is the Flat Base(FB) Ext.Punch...

Without the Internal Punch, screw on the die.
The raise the ram and die.
Now lower the external punch to the limit mark.
Check for clearance through bleed hole with a open paper clip
If you don't feel the external punch, you are good go.

But for my unmarked Ext Base form punches..
Do the above procedure, But lower the Ext punch until the paper clip touches..
This the Maximum depth you can screw in This external Base Form Punch!!!
I Mark this with a sharpie, Measure and record the length from tip to mark.....keep for future reference...
Nice collection.
 
  • Like
Reactions: Ca_Varminter
Thanks for everyone's patience and thank you all who have contributed and help me compile, correct, and organize this information. It still needs some work, but I've numbered the steps in the hollow-ogive slug making process so that if anyone has input or questions, these numbers can be used as reference points. One thing for sure, the longer that a post is, the tougher it becomes to organize it due to character limitations. I hope that some of y'all find something here useful.

You may notice that the diagram has changed as I have added a few new labels and corrected some names to components of the press. In post #3 you'll see a video that was shared with me this morning that pretty much shows the process of making hollow-points and hollow-ogive slugs. If I made it look complicated, the video should makes it look easy. Thanks again for that link @Long_Shot. There's more to come. If any of you have anything to contribute to the thread concerning use of the Corbin S Press please post it, but keep in mind that this thread is geared toward beginners so lets make it a point to not talk over their heads about advanced processes. Also when we use swaging terminology please try to define the jargon that may be unfamiliar to most others. If you're reading this and don't understand a term or part of a process, please ask for an explanation.
 
  • Like
Reactions: Ed99
Two 10-shot groups with slugs I made. The left target is .357, 120 grain hollow point flat base slugs and the right target is 125 grain hollow point flat base slug 10-shot group. I like how these 120 grains shoot. Fortunately I took the time to get chrony data so I have a baseline.
IMG_6228.jpeg


And shot another 10-shot group with the 120s. I’ve seen enough to make a decision on these.

Edit: groups shot from 50 yrds seated at a plastic folding table with my Benjamin Bulldog M357 in a Caldwell turret rest.
 
Last edited:
Two 10-shot groups with slugs I made. The left target is .357, 120 grain hollow point flat base slugs and the right target is 125 grain hollow point flat base slug 10-shot group. I like how these 120 grains shoot. Fortunately I took the time to get chrony data so I have a baseline.
View attachment 494920

And shot another 10-shot group with the 120s. I’ve seen enough to make a decision on these.

Edit: groups shot from 50 yrds seated at a plastic folding table with my Benjamin Bulldog M357 in a Caldwell turret rest.
That 120 grain slug looks really good. It's amazing what 5 grains and a little length adjustment will do to how a slug shoots. Now to fine tune it for longer range shots. This is important to see how the slug will drop down over the apex of it's trajectory and still maintain a tight group.
 
This is a great thread. I have no experience with swaging air rifle projectiles and I am very interested.

I have cast and swaged and shot many pistol and rifle bullets. And I do have some observations if I may....

A digital scale weighing in grams usually has a fairly broad sensitivity. When weighing projectiles a beam scale has a 1/10 grain sensitivity. And you can see a deviation of .05 grain. I always use a beam scale to weigh projectiles for this reason.

Lead alloy is super important. I would imagine it is even more so with a process like this. Cores made with scrap lead having impurities will have faults, weight fluctuations and problems with CG. Lead gets harder fast with impurities and even harder when you form it with pressure. Hard lead ablates in the barrel easier and causes leading. Pure refined lead is important. Printers lead or linotype casts great bullets. Wheel weights and scrap lead not so much.

Hand cast lead cores won't be as good as extruded lead wire. The temperature of the mould and the lead is super important when casting. It's an art. Without good temperature control a guy can cast a lot of wrinkled cores. Lead shrinks when cooled depending on alloy and cooling rate. So getting weight/dimension stability can be tricky.

On the other hand lead wire cold swaged through a die is perfect. It does not have the problems as hand cast lead cores would. I've never worked with swaged wire cores but I know it would eliminate the problems you face when trying to hand cast weight and dimensionally uniform castings.

The comment made about fragmenting lead projectiles by swaging flakes and scrap is a good one. It's basically a "sintered" projectile. This could be very beneficial for bullet performance at airgun speeds. Also for making projectiles that are safer in urban settings. If you perfected swaging uniform lead cuttings you could make one heck of an airgun slug.

Electroplate a swaged air rifle bullet with copper or tumble it in molybdenum dust and you could push it as fast as compressed air will expand behind it.

Hope it wasn't too far off topic.

@Bedrock Bob If you’re not familiar with swaging or the Corbin system please read the first post in this thread. Then locate the links to information listed on the Corbin sites posted within this thread. There’s a good amount of downloadable literature to read on swaging on both Corbin sites. It’s a good idea for those that are truly interested to start there.
 
@Bedrock Bob If you’re not familiar with swaging or the Corbin system please read the first post in this thread. Then locate the links to information listed on the Corbin sites posted within this thread. There’s a good amount of downloadable literature to read on swaging on both Corbin sites. It’s a good idea for those that are truly interested to start there.

My apologies for the off topic input. I'm simply not qualified to comment on the process given my lack of experience with it.
 
My apologies for the off topic input. I'm simply not qualified to comment on the process given my lack of experience with it.
@Bedrock Bob Doesn’t mean you can’t learn. I’ve been reading this stuff for about two years and I’m still learning. You seem to have a head start. Dave Corbin has pretty specific recommendations for how to use his system and has complied a lot of good information.