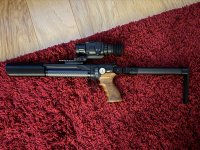
Huben Huben GK1 .22: A Beginner's Journey to a DIY Mini Carbine

Changed the mount from BR now a left folder with a quick release thanks to BR and Andrew

PXL_20240424_023755801.jpg


PXL_20240424_023816785.jpg


PXL_20240424_030531286.jpg
 
Converting a Ski Pole to a Stock!

Stick.jpg


I knew I was going to cut the sticks at the portion where it would be a uniform diameter, altho the black and white portions obviously have different diameters.

I designed the mounting block in several pieces.

The first was a piece to attach to the pole:

1714982396365.jpeg

The side blocks would be threaded to 6-32 for set screws to lock to the pole.


This interface bracket would then mount to a bracket that would clamp to a picatinny rail:

Pole mount2.jpg


The picatinny clamp portion:

Pole mount5.jpg

I designed the block to exactly reciprocate the shape of the picatinny tower (red outline).

2x6-32 screws would pass through the smaller clamp block into the body of the main block, which would be threaded (Yellow arrows).

The little green block sits exactly between 2 slots of the picatinny rail to prevent the block from sliding up and down the pic rail.


So, off they went to the printer.
I bonded to pole mount to the clamping block with Tap Plastics Acrylic cement--literally melts the plastic into 1 solid piece.

Pole block1.jpg


Mounted up with the pole:

Pole block2.jpg


1714982694572.jpeg
 
Hi all! Back after some traveling.

DIY Ski Pole Stock, Mark 1

Next I designed the shoulder interface portion:

This was actually the most complex thing I had designed thus far.

1716711451097.jpeg


I went for a J shape, which is channeled to accept some rubber gasket I had laying around the shop. Then there is the tube interface portion with the set screw mounts. And finally the wing between the pole interface and the J in order to stabilize the J.


Off the printer:

Shoulder off the printer.jpg


Added the gasketing, stuck it on there with some hot glue:

Shoulder gasket.jpg


Cut the poles to the appropriate length:


Shoulder cut.jpg


Added a little heatshrink to cover up the white portion of the pole, and I give you my adjustable length pic mount stock made from a ski pole:

Stock complete1.jpg


Stock complete2.jpg
 
Last edited:
DIY Stock from a ski pole, Mark 2

My first version as pictured above had just a tiny bit of wiggle at the pic rail attachment.

So I revisited the clamping method.

After examining various off-the-shelf clamps of all sorts, I realized that my approach was wrong. The point of the clamping portion is NOT to reciprocate the shape of the picatinny rail tower. The point is to use the shape of the picatinny tower to clamp to, in order to stabilize the attached device. A subtle but important difference.

So here was my redesign:

New stock clamp2 labeled.jpg


Stability is all about the clamping surface, highlighted in red. You need to generate strong force in the direction of the arrows, so that you clamp hard against the reciprocal face on the pic rail. Since the interface is slanted, this force will both hold the clamp centered as well as pull it tight to the pic rail.

For this reason, I went with a 3 piece design. I felt the symmetrical clamps would give more stability.

To generate more clamping power than a reciprocal shape could make, what I did was slightly bevel the center block portion (blue highlights) until they are actually slightly smaller than the reciprocal face on the pic rail. The difference is only about 0.4mm--too much difference and you will crack the clamping blocks. Too little difference and you will get less clamping power.

Next, I moved the through-screws much lower down, so that they are clamping as closely to the red surface as possible. They are low enough that you have to position them to go in between the pic towers. See the yellow circles.

The green highlighted stub remains, also lying in between the pic towers, which prevents the clamp from translating up or down the pic rail.


Here is the set, off the 3d printer.


Block mark2.jpg


And mounted up. Now this was fully stable, with no wiggle, even when exerting strong torque at the far side of the stock.


Stock block2 mounted.jpg
 
DIY Stock from a ski pole, Mark 3!

I’m going to jump ahead about a month. I was and still am 100% satisfied with the function of my Mark 2 version.

But…to my surprise, I decided I liked the fold-ability of the relatively inexpensive 5KU stock I purchased from evike.

5ku attached.jpg


At first, I thought folding was not really something I would appreciate as I do all my hunting on my own property, so I have no need to back-pack it. But actually it made storing it on my laundry room shelf much easier.

However, I found my DIY shoulder interface much more comfortable.


I had a thought to 3d print my own folding mechanism--however on close examination, the 5ku mechanism is not one that I would recommend recreating in plastic. This metal profile is what gives it its snap-to action. It would probably wear away too quickly if made from plastic.

1718781533868.jpeg
 
Fortunately, the stock portion is designed to be removed (held on by a single screw), so it was as simple as designing yet another mounting block that mimics the 5ku version.

Stock block mark3.jpg


And Frankenstein my shoulder interface and stock, to the folding/pic mount action of the 5ku.

Stock Mark3.2.jpg


And this is how I have been using it, almost daily squirrel hunting. There has been no loosening or wiggling, or necessary adjustments. I take it off my shelf, unfold the stock, and hunt.


A little video of real world use for me. Put 3 pellets into the black circle. I have pested multiple squirrels exactly as in the video--they like to hang out at that wood pile.


Picatinny Top Rail

Sorry on the recent lack of posts, been doing a lot of travel in the last few months.

As I have mentioned previously, I prefer a scope. For those who like a red dot site, the very popular mount seems to be great. But I prefer some magnification--in which case the dovetail really doesn’t reach back far enough on the pistol.

In fact, my favorite scope is my Hawke Airmax Touch--this scope you put your eye right up to the back of the scope, so it needs to be mounted really far back.


There are various dovetail to picatinny offset rails on the market.

Dovetail adapter.jpg


I started off with this one, but really I wanted a picatinny rail that pretty much runs the length of the pistol, even past the back, beyond the iron sights (red line).

Dovetail offset2.jpg


So I started to plan my design:

Top rail diagram.jpg


There are a few important clearance points. Obviously you have the dovetail mounting area to the left in order to land a dovetail clamp.

There is a raised bump at the red circled screw.

The blue arrow is the back mount, where I will utilize the iron site screw mount, M3 threaded.

I also discovered that the iron site rises a little just past the screw mount, so that it is not exactly flush with the top of the pistol (green outline).


Here was my design:

Toprail1.jpg


Off to the 3D printer.

1722239568894.jpeg


1722239613788.jpeg


And mounted up with my scope.

1722239682729.jpeg


1722239701468.jpeg


By the way, this scope--the Hawke Airmax Touch--is just awesome. I don’t have decades of hunting expertise, but I feel like this scope is a bit of a gamechanger. Specifically designed for rifles with minimal recoil, the eye relief is super short (technically 30mm). Basically you put your eye right up to the scope. It’s so easy to use--I don’t find I need a butt plate to index my face, and search for the proper eye relief. Just put your eye up to the scope.

The close eye relief apparently gives it its super large field of view. It’s large enough that I often work with both eyes open.

The focus is 10 yds to infinity, obviously it has a side wheel for parallax focus.

Mounting can be a little challenging, as it needs to sit way back, in order to be closer to the shooter's face.

The only downside I find, is that I can’t find flip up scope caps that work well with the super close eye relief.
 
Next step: Bottle clamp

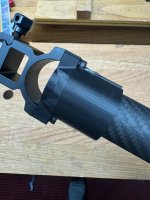
I like a foregrip on my mini-carbine--so that’s means a picatinny bottle clamp.

On the now departed “Taming the bark” thread, someone posted this .stl for a bottle clamp. I went ahead and printed it, and have been using it for a while:

First bottle clamp.jpg


I did find that it wouldn’t grab the surface of my bottle super tight, so there was a little bit of slide even with hard tightening. I think this may be more of a problem of the material just not generating enough friction against the carbon fiber surface of the bottle. Altering some of the print properties or texturing the surface would probably fix that. Also, it seems to just happen over time--maybe differential reactions to temperature change between the metal bottle and plastic bottle clamp.

I did a little tactic that I have done before: Add a section of silicone tape (ie space tape)--which I believe I picked up at my local dollar store--and get it between the clamp and the bottle, on both sides of the clamp.


space tape4.jpg


In order to get the clamp on with the tape without having the tape bunch up, what I do is cut the tape extra long.

Hold the end of the tape that is sticking out, and then slide the clamp on.


Space tape3.jpg


Tighten, and it should be nice and secure.

Trim off any extra tape.
 
  • Like
Reactions: MrP