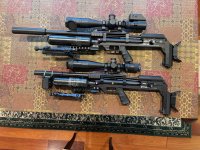
FX Maverick VP finally ready!

I finally put on the replacement top rail, adjusted the trigger and mounted the optic(Athlon HERAS SPR 2-12x42, Med UTG Pro rings). It’s a .22 cal, going to shoot the FX/JSB 25.4 and 18.1 pellets.

After trigger testing, I gave it the first fill from my RovAir. Didn’t blow up, guess I did that right lol.

I noticed how much shorter the Maverick 600mm was than my TX200 after sitting them side by side. A 9” difference and still 4” shorter with Tanto. Hopefully it can out shoot the TX.

39FC4F66-F6C4-48B0-BE84-3F7D107EF023.jpeg
DAA33880-7ADF-4C00-A357-E085D78875D3.jpeg
 
Last edited:
Issues and Questions:

So my trigger went to 1# after a few hundred shots. I’m going to increase the weight a 1/8 turn and re-test. I only moved the 2nd stage weight to 2.5#. Does anyone know why puting on the chassis causes the trigger weight to change(normal)?

I’m going to get a Wika gauge for the rear reg because the stock one’s scale is too close together. I’ll have to tune, because the tune I got from SPAW shoots the 25.4 at 990 on PW 7 and going down on the PW causes the ES to increase. Supposedly set at 160/120 bar, anyone got a guesstimate range to start at?
 
Which gauges are you using, do you like the digital? What seals did you use?
Cheap Amazon Gages, they work fine. Seals?? On the gages stock X-rings, on the rest of the gun, McMaster-Carr, The O-Ring Store and I believe Metric O-rings and O-rings and more. Be warned FX has changed the spec on some of the o-rings, the little buggers on the regulator adjuster are N90's and are a beech to get on, I've found that chucking them in boiling water helps. I have a tool in the works that may help, well it does help but it needs a small modification the guy making them didn't understand the sketch I gave him.

Here is something I posted some time ago..

I've been digging deeper into the FX Mavericks o-rings and I've found that there are serious errors in both the online schematic AND the schematic they send with o-ring orders.

The schematic sent has different hardness's i.e. NBR90 instead of NBR70, this makes sense except one is several mm thicker than possible in it's location. The on-line schematic has the old durometer numbers but the right sizes. Numbers below correspond to the online schematic.

13) 10.0 x 1.5 NBR90 inside Regulator hole at bottom of threads

18) 7.5 x 2 NBR70 Regulator Body

20) 4.0 x 1.5 NBR90 End of Piston

23) 4.0 x 1.5 NBR90 Inside Regulator Body

25) 2.0 x 1.0 NBR90 (2x) Adjustment Screw, suggestion heat in boiling water slip on first one, then second one, or if you have a witches hat it’s easier. If you have a 3d printer and would have my everlasting gratitude you could print up a few of them. And no, heating them doesn't mess them up, they return to shape.
 
  • Like
Reactions: Jay308
Cheap Amazon Gages, they work fine. Seals?? On the gages stock X-rings, on the rest of the gun, McMaster-Carr, The O-Ring Store and I believe Metric O-rings and O-rings and more. Be warned FX has changed the spec on some of the o-rings, the little buggers on the regulator adjuster are N90's and are a beech to get on, I've found that chucking them in boiling water helps. I have a tool in the works that may help, well it does help but it needs a small modification the guy making them didn't understand the sketch I gave him.

Here is something I posted some time ago..

I've been digging deeper into the FX Mavericks o-rings and I've found that there are serious errors in both the online schematic AND the schematic they send with o-ring orders.

The schematic sent has different hardness's i.e. NBR90 instead of NBR70, this makes sense except one is several mm thicker than possible in it's location. The on-line schematic has the old durometer numbers but the right sizes. Numbers below correspond to the online schematic.

13) 10.0 x 1.5 NBR90 inside Regulator hole at bottom of threads

18) 7.5 x 2 NBR70 Regulator Body

20) 4.0 x 1.5 NBR90 End of Piston

23) 4.0 x 1.5 NBR90 Inside Regulator Body

25) 2.0 x 1.0 NBR90 (2x) Adjustment Screw, suggestion heat in boiling water slip on first one, then second one, or if you have a witches hat it’s easier. If you have a 3d printer and would have my everlasting gratitude you could print up a few of them. And no, heating them doesn't mess them up, they return to shape.
I appreciate all the knowledge you have thrown my way! I’ll look into those gauges also.
 
Put it to the test! It’s fun and frustrating haha

 
Put it to the test! It’s fun and frustrating haha

I will give it a go
 
  • Like
Reactions: Florida_Man
Issues and Questions:

So my trigger went to 1# after a few hundred shots. I’m going to increase the weight a 1/8 turn and re-test. I only moved the 2nd stage weight to 2.5#. Does anyone know why puting on the chassis causes the trigger weight to change(normal)?

I’m going to get a Wika gauge for the rear reg because the stock one’s scale is too close together. I’ll have to tune, because the tune I got from SPAW shoots the 25.4 at 990 on PW 7 and going down on the PW causes the ES to increase. Supposedly set at 160/120 bar, anyone got a guesstimate range to start at?
I’d call SPAW and ask them why he tuned it that way. Don’t accept any lame excuses, as it’s not suppose to do that
 
I’d call SPAW and ask them why he tuned it that way. Don’t accept any lame excuses, as it’s not suppose to do that

I’m curious if 990 was what SPAW said or the readings the OP is getting at his home.

Altitude could be a small factor. His profile says Raleigh NC which is 331’, Yulee Fl where SPAW is its 36’. And the temperatures can be different.
 
I’m curious if 990 was what SPAW said or the readings the OP is getting at his home.

Altitude could be a small factor. His profile says Raleigh NC which is 331’, Yulee Fl where SPAW is its 36’. And the temperatures can be different.
The shops chrono sheet shows 910-908 on PW 7 with the 25.4 MRD and regs set at 160/120. My FX pocket chrono reads 990’s on PW 7, verified the FX chrono reads close to my other one. The rear little gauge looks to be close to 120 but could be 130. It was 80 degrees when I chrono’d, last week.

I’ll just have to tune it myself, but would have been nice if my requested tune was correct, but then again my gun came with a damage top rail(not from shipping) but no response from the shop at all when I asked about it. Not cool but UA/FX took care of it. I won’t order anything from SPAW anymore.
 
Last edited:
Sure temps from location differences can and will affect speeds but to dial down and the speeds go faster is not good. I mean, then what is the purpose of having a power wheel, then? If it goes faster at 6 and velocity drops more and more from 5 on down then that’s one thing. But if it increases or stays the same and doesn’t lower in speeds then that’s not right.

@ Jay- do yourself a favor- on the left side of the gun is a small black cocking block, that the cocking arm is connected to, and this block is anchored to the stainless or titanium cocking rod, with two M4 grub screws. Those typically have locktite on them but trust me when I say those will work loose in time, and throw your velocities way off(like up to 100 fps) cause that rod will slip and cause your pellet probe that’s attached to the rod to get misaligned with the air transfer port.

If you try bearing down on those grub screws you chance rounding off the Allen socket, then you’ll never be able to tighten it and worse yet, remove them.

Source two M4 x 6mm length socket head Torx screws and replace those grub screws one at a time. Do use locktite on the new fasteners and do heat the grub screws before attempting to remove them. The Torx head will allow you to bear down tight on that cocking titanium rod, and the chances of stripping a Torx head is rare. You’ll sleep better knowing you’ll never lose your transfer port alignment, lol
 
Last edited:
Sure temps from location differences can and will affect speeds but to dial down and the speeds go faster is not good. I mean, then what is the purpose of having a power wheel, then? If it goes faster at 6 and velocity drops more and more from 5 on down then that’s one thing. But if it increases or stays the same and doesn’t lower in speeds then that’s not right
Power wheel works correct, 7 - 990, 6 - 970, 5 - 940 , 4 - 930, but using the PW does increase the extreme spread in the string to 25+ at PW 5 and 4. I have read this is common if using the PW to slow down the fps.
 
@ Jay- do yourself a favor- on the left side of the gun is a small black cocking block, that the cocking arm is connected to, and this block is anchored to the stainless or titanium cocking rod, with two M4 grub screws. Those typically have locktite on them but trust me when I say those will work loose in time, and throw your velocities way off(like up to 100 fps) cause that rod will slip and cause your pellet probe that’s attached to the rod to get misaligned with the air transfer port.

If you try bearing down on those grub screws you chance rounding off the Allen socket, then you’ll never be able to tighten it and worse yet, remove them.

Source two M4 x 6mm length socket head Torx screws and replace those grub screws one at a time. Do use locktite on the new fasteners and do heat the grub screws before attempting to remove them. The Torx head will allow you to bear down tight on that cocking titanium rod, and the chances of stripping a Torx head is rare. You’ll sleep better knowing you’ll never lose your transfer port alignment, lol

Thanks, I didn’t realize this could effect fps. I’ll look up how to check the probe alignment and check those screws.