Snowpeak Pinty Bullpup

When you say small set screw at the end of the cylinder, do you mean at the stock end? I see 2 screws at the stock end, the bottom one of which someone has told me is the hammer spring adjustment, which is silver. There is a black screw head above that but I do't think that is the one you are talking about
Take the stock off, since you cannot see the screw with the stock on.
The degas screw is at the rear end of the air tube.
 
I am returning my Pinty bullpup for 2 reasons.

1. My bullpup has been leaking since I received it

2. Trigger stopped working


Today I have adjusted the trigger screw, there is only one at bottom rear end of the receiver.
After that the airgun would not cock, no matter how much I adjusted that screw or reverted the adjustment.
The hammer is no longer held back by the sear when cocking.
Pulling the sidelever back will not have the sear engage the hammer anymore.

I even had a few random shots whenever I tried cocking the airgun.

I think the bullpup is really good for the price, but the unreliable trigger is too much for me.
 
youve got the trigger screw in or out to far put it back the way it was. turn in slowly itill it cocks . then that is as far as you can turn it in or out.
I appreciate your help, but I really know what I am doing.
I adjusted that single screw many times.
Pulling back the sidelever will not engage the trigger no matter what I do with the screw.
 
  • Like
Reactions: Dairyboy
Man,I am really impressed with the quality of this thing. It just looks good and feels so right. For 225 shipped I am content even if i have to fiddle with it.

1000012029.jpg
 
Posted this yesterday:

The weather guessers got things right in North GA today, the temperature hit 58 degrees and sunny with virtually no wind, a great day to be in the woods with the new Bullpup. The rifle was a pleasure to tote through the woods, especially with the 5 oz Sig red dot on mine. After confirming a rough 30 yard zero, I set out on a mile and a half woods waik but saw nothing moving in the woods except a few birds. About an hour in I though I heard a squirrel stiring in the leaves but after a bit of stalking I looked up over a large rock to see a dozen wild turkeys scratching around. Turkey season doesn't start for another couple months in GA and .30 cal or larger is required. So I stood up and they a turned on the afterburners and skedattled.

The WMA I hunt borders one of the most visited lakes east of the Mississippi and with the crazy rain and wind we had the last few days, there were more than a few hoppy beverage cans floating about. My range finder showed cans from 25 yards out to 75 yards so it was game on. I use Strelock Pro for holdover when necessary and it seemed to be dead on today. The rifle shot great at range with the Apolo 18 gn Air Boss pellets I was feeding it. Everything I shot at was a hit except for one can that was 74 yards out and I miscalculated the holdover on the first shot. The second sent the can to Davy Jones Locker. My Pinty Bullpup is a shooter!!

I had no problems with the rifle, it feels like I might have won the Airgun Lottery with this one, at least so far.(knock on wood) Trigger feels really good, does not affect good accuracy. Everything worked smoothly and properly as it should.

Crazy weather is coming back tonight with rain/snow mix and temps in the teens for a couple days. Hopefully the great thaw will come soon and others will be able to get out and enjoy the Bullpup.
 
  • Like
Reactions: DwarvenRanger
I think one of the sear/trigger springs is not in the right place.
I will have to watch the video where it is disassembled to see what springs are in the sear area.
You can do it, and the worst case scenario: You will learn a lot. We all want to help.

I have one of the first P15's and I will pull it apart if it helps. Post pictures of your findings and let's sort the damn thing out.
You'll most likely end up enjoying the tinkering.

There are something like 5 o-rings in the rifle. Fill system is prone to leaking. It just needs the right size O-ring. Good luck.
 
  • Like
Reactions: nobody1
I partly disassembled the bullpup.

I used this Snowpeak P35 schematic: https://www.airgunnation.com/attachments/p35-parts-diagram-pdf.324607/

The P35 is almost identical to the Pinty bullpup, by comparing my bullpup with the P35 schematic.

Got to the regulator and valve.

Messed up with trigger and linkage rod until I got the trigger working.
Somehow the linkage rod got shorter and the hammer no longer reached the sear.
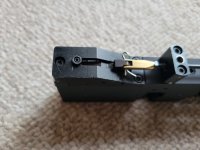
There are 2 screws at the end of the rod which can adjust the rod length.

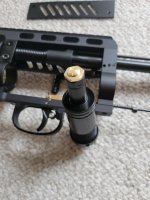
I took out the degas screw, and did not realize that there is a ball bearing underneath.
Don't lose it because I almost did.
 
Last edited:
I partly disassembled the bullpup.

I used a Snowpeak P35 schematic.
The P35 is almost identical to the Pinty bullpuo, by comparing the bullpup with the P35 schematic.

Got to the regulator and valve.

Messed up with trigger and linkage rod until I got the trigger working.

Somehow the linkage rod got shorter and the hammer no longer reached the sear.
There are 2 screws at the end of the rod which can adjust the rod length.

I took out the degas screw, and did not realize that there is a ball bearing underneath.
Don't lose it because I almost did.
Pictures?
 
  • Like
Reactions: Jager762
If anybody has questions let me know.

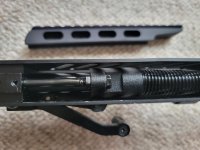
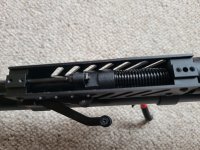
A photo will show the position of the degasing screw, at the rear end of the air tube.
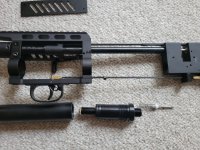
A photo will show a screw that you need to loosen if you want to remove the airtube.
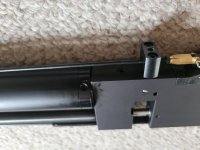
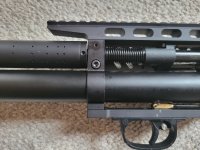
A photo will show the small screw used to adjust the sear position. Unfortunately that screw is already stripped and useless.
A photo will show the end of the linkage rod with the 2 screws that allow you to change the length of the linkage rod.

After adjusting the length of the linkage rod the trigger feels good, even though the screw which pushes the sear down has been removed.

So, ask questions if you have them!
 
Last edited:
  • Like
Reactions: Shaky2
Thanks for the pictures. I see there are a few upgrades after P15.
There's a built-in plenum too. No wonder it puts out such a decent amount of energy.

The sear adjustment screw is an easy fix and there are many options. Just don't go paying top dollars for it. The way I see it, there's no risk of structural integrity and the job is simple enough with a few basic tools.

A gem for the price 👍
 
Last edited:
  • Like
Reactions: nobody1
Thanks for the pictures. I see there are a few upgrades after P15.
There's a built-in plenum too. No wonder it puts out such a decent amount of energy.

The sear adjustment screw is an easy fix and there are many options. Just don't go paying top dollars for it. The way I see it, there's no risk of structural integrity and the job is simple enough with a few basic tools.

A gem for the price 👍
Do you know the thread size of the sear screw?