• *The discussion of the creation, fabrication, or modification of airgun moderators is prohibited. The discussion of any "adapters" used to convert an airgun moderator to a firearm silencer will result in immediate termination of the account.*

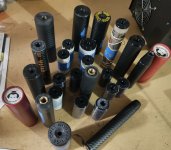
Show me your DIY moderators!!!

I have been making my own moderators/silencers for 40 years. I have done that because of all the restrictions and taboos associated to them. It has only been a recent thing that moderators have been commercially available to the general airgun community. Still, there are restrictions in shipping and restrictions in some locations. So my advice to anyone wanting to do this is keep your mouth shut!

Having said that, I've tried many different designs and some work better than others. Some only work well for a short time. Others are too heavy or suffer size issues. I will list what does not work well then describe my current design. I know these things from first hand personal experience building them
Bad​
1) Drilled or slotted tube construction tying both end caps together does not work.
2) Internal expansion chambers stuffed with sound absorbing material works for a short while, then it degrades.
3) Bleed holes drilled in either the end cap or OD tube do not work.
4) Continuous tubular baffle designs often cut with CNC equipment do nothing.(Refer to rule (1))
5) Tight pellet to bore clearance adds little to no performance value.

Some designs baffles work very well, others not so much. My current design uses an inverted cone baffle installed pointed toward the breech. I use 3 baffles with an internal length of 7 inches where the fist baffle is 3 inches from the muzzle. The other baffles are equally spaced at 2 inches each. I use the standard Donnyfl shroud 1/2-20 adapter. It has a .375" bore. The larger the bore the better the shroud volume adds to the first expansion chamber (very important). The baffles fit closely to the ID of the 48 mm aluminum outer tube. The construction is based on 3 all thread stainless steel draw rods compressing the end caps and outer tube together. They also locate the inverted cone baffles incorporating aluminum tubes stacked over the draw rods and through drilled baffles. I use a stack of Belleville washer springs which tension the baffle stack to the end caps. Please note the 3 stainless steel Acorn nuts tensioning the end caps and outer tube together. The all thread rods screw into tapped holes in the rear cap they then protrude through the through drilled front cap. The internal bore to pellet clearance is .5 mm/ .020".

This moderator is mounted to a .25 cal FX Crown. This moderator does attenuate the muzzle velocity by 40 ft/sec. This occurs because the column of air in front of the pellet is also attenuated as well as the propelling air charge behind the pellet slightly reducing the differential pressure across the pellet.

One final note: The inverted cone baffle really helps along with the free space between the caps and baffles. As the pellet exits the muzzle, the pressurized propelling air charge attempts to pass the pellet with an expanding cone of turbulent air. This air then collides with the baffle deflecting the air away from the pellet path pressurizing each chamber progressively though the moderator reducing pressure, air velocity and sound very effectively. My edit is to add that the overall weight is 356 grams. The finish is done by hard anodizing, like a camera body. I feel I can save about 100 grams of weight using lighter draw rods and CF body and end caps, my next project. I also made a ground rod the exact size of the barrel choke diameter as an alignment gauge after installation to verify equal spacing around the pellet path to the front end cap. (Clipping Insurance)

IMG_1727.JPG


IMG_1728.JPG


IMG_1729.JPG
 
Last edited:
Interesting! I would post pics of my DIY moderators, but they are simply PVC, hair curlers, ScotchBrite type material and washers of various materials and duct tape. They are also slip-on, over the shroud in most cases, and none are threaded. They are made for .177 (maybe .22) airguns up to about 20fpe.

If I showed you one, you would just see a 1 inch white PVC pipe for the most part. Mine are not pretty. I follow function over form and don't care what it looks like as long as it does the job of letting me hear the pellet hit the target and not scare off the other pests so easily as they would without it. (grin)

BTW, they are cheap to make (about $5-10 per) and they work quite well for lower caliber (.177/.22) airguns! (smile)

No, I don't sell them as ANYONE can make them easily/legally for airguns.
The one I have pictured cost me less than $15. A foot of aluminum pipe 1.5" od is $20. So $10 for a 6" body and less than $2 for the aluminum to make the end cap and only 17 cents per baffle for the plastic. If you dont have access to a lathe then of course the cost would go up a bunch.
 
  • Like
Reactions: BackStop
The one I have pictured cost me less than $15. A foot of aluminum pipe 1.5" od is $20. So $10 for a 6" body and less than $2 for the aluminum to make the end cap and only 17 cents per baffle for the plastic. If you dont have access to a lathe then of course the cost would go up a bunch.
No access to a lathe or pretty much any other "machining" tools. That's why I have stuck with PVC, etc, etc, etc.

Works well, just not pretty. (grin)
 
  • Like
Reactions: LDP
No access to a lathe or pretty much any other "machining" tools. That's why I have stuck with PVC, etc, etc, etc.

Works well, just not pretty. (grin)
Back when I didnt have access to equipment I did basically the same thing. It works fine just not as many options for design but that doesnt matter like you said if it gets the job done. As a kid I lived in a city where houses were very close to each other and I needed to be very quiet removing the birds from my dads fruit trees. I used plastic bottles for suppressors. I would attach a bottle to the end of my airgun and shoot a hole thru it then open the hole just a small amount. The bottle worked very good on my multi pump crosman airgun.
 
  • Like
Reactions: BackStop
This one is most of the way finished. I dont know if I will be painting the outside or just leaving it or just leaving it for now. I will be using this as one of my test beds for baffle designs. This one is a shorter setup and I will do a longer one for testing against each other.
View attachment 292066View attachment 292067
You can get one more baffle in the stack if you turn that cone inside that cylinder on that baffle in the background.

I wish I had studied (and had the equipment) to do machine work like that. I have zero skill in that arena.
 
I will only be using one or two baffles in this moderator. I tried it out empty and its very quiet. If I add more than one or two baffles I can guarantee the noise will get louder and sharper.

I have a blast baffle design I made in cad. The blast baffle is designed to allow air into a small outer chamber that will be packed with sound deadening material and the outer tube will be vented to allow a pressure drop. I believe the pressure drop will make the sound signature very low. Hopefully it works good.

Pics of the blast baffle.
34924F05-C665-403B-8D04-819FF935398D.jpeg


A little clearer pic. You can see the cone inside the blast portion of the baffle and the vent holes to allow the air to move into that outer chamber it creates. That area will be packed with sound deadening material to slow the velocity of the air. the outer tube will be vented at a point not inline with the holes in the baffle. The idea is for the holes to control the amount of air allowed to push into that chamber thru the size they are. Then the material will slow the velocity of the air by way of its density. The outer tube will be vented in a way the air wont have a direct path from the baffle hole to the tube vent causing the air to travel thru some material first as pressure builds in the outer chamber. That should allow the first chamber of the moderator to take on as much air as possible before the pellet passes thru the first baffle and drop the pressure of the air stream thru the venting process. The air exiting the outer tube vent should also be slowed significantly due to the material it will have to pass thru before exiting. It will take some experimenting of hole sizes and chamber sizes to perfect it but it should work good at least it does in my mind. Basically modifying some of the best designs like hugget but creating a system that strips more air from the path which in turn should make it quieter. We will see.
D0213E93-66D4-44C3-8939-29E381E454B6.jpeg
 
Last edited:
  • Like
Reactions: OldSpook and qball
@LDP great work! You are definitely on the right path, please let us know your results!

Although I'm not sure if extra fancy chamber/baffle design do much except for taking up valuable volume but you won't know till you try.
I agree and the reason I dont plan on adding a stack of cone baffles. In my experience adding multiple stacks of baffles that are cones, modified m or k style baffles create a louder sound signature compared to a stack of simple flat washer style baffles using spacers between the flat washer style baffle with everything else equal in the two designs. I have several moderators that are just 1.5" outer tubes with 3 flat faced baffles .200 thick. The first chamber is roughly 2" then a flat baffle, second chamber roughly 1" then another flat baffle followed by another 1" chamber and flat baffle with the final chamber 2" and ending with a cone end cap like the one pictured above. Those moderators are very quiet on everything from my low powered .177 up to my high power .25. Using the same exact tube but adding all cones made the moderator significantly louder.

This new design with the cone stripper and outer chamber for bleeding air will hopefully out perform the flat baffle design. The cone style baffle takes up volume more than a flat baffle. Using this cone design I will try a 1.5" outer tube as before. First chamber 2" and will have the outer chamber and cone baffle in the pic, Second chamber if I add a second cone baffle will be apprx .750 third chamber 2" ending with the coned end cap. So that should keep close to the same volume as the multi flat baffle setup. Where it makes up for the slightly smaller volume will be the better air stripping and the first chamber venting into the outer wall and then to the outside. I will try the exact same first cone and outer chamber but no second baffle to gain more volume. So just two large chambers with that cone and outer chamber in the middle. I will report back how they compare to my other flat baffle designs.

If you want a stack of cone baffles, m or modified m baffles or k baffles you must increase length and or diameter over a simple thin flat baffle design to get the same level of sound moderation. Volume is king for air suppression and fancy baffles take up more volume. Anyone who has played with designs will know this to be true and the reason the smaller od huggets with basically no baffle at all just sound dampening material and internal volume are some of the best sounding mods. A moderator using the more elaborate designs will have to be 1.5" od and 6" to 8" long to get the same performance as a 1.5" od x 4" - 5" long moderator with no baffles or a couple simple flat baffles .200 thick for stability in the tube.
 
  • Like
Reactions: qball
I agree and the reason I dont plan on adding a stack of cone baffles. In my experience adding multiple stacks of baffles that are cones, modified m or k style baffles create a louder sound signature compared to a stack of simple flat washer style baffles using spacers between the flat washer style baffle with everything else equal in the two designs. I have several moderators that are just 1.5" outer tubes with 3 flat faced baffles .200 thick. The first chamber is roughly 2" then a flat baffle, second chamber roughly 1" then another flat baffle followed by another 1" chamber and flat baffle with the final chamber 2" and ending with a cone end cap like the one pictured above. Those moderators are very quiet on everything from my low powered .177 up to my high power .25. Using the same exact tube but adding all cones made the moderator significantly louder.
This moderator ^^^ is 174cc. It should be quiet even if it is an empty tube with end caps. I do not say this lightly or to insult or denigrate your opinion. My experience is just different. That assertion agrees with what you have written below. It is big and so doesn't require sophisticated baffles. Generally I have also seen this to be true but there is the exception which you run across now and then that makes you go, "Hmmm, WHY is that one different?" You have seen them no doubt. Consider the stock moderator on a Stormrider. It has six baffles and an expansion chamber. It is 64cc total volume, 120 long and 25 wide outside. One end has a cone which attaches to the bore which reduces the calculated volume some. That moderator reduces a 90 dB muzzle blast to 65-66 dB. It is very, very good. Six "cone" shaped baffles in 86mm inside that tube. I've been trying to beat that moderator (0.35 dB/cc) and have not managed it yet. So far the closest I have come to it barely beats the empty tube (0.25 dB/cc) at 0.31 dB/CC. That baffle set has 5 K baffles and a small expansion chamber in 86mm the same space as the stock moderator baffle set... It is an insert package for the Stormrider. Other things I have done have come close but not as close as that one.
This new design with the cone stripper and outer chamber for bleeding air will hopefully out perform the flat baffle design. The cone style baffle takes up volume more than a flat baffle. Using this cone design I will try a 1.5" outer tube as before. First chamber 2" and will have the outer chamber and cone baffle in the pic, Second chamber if I add a second cone baffle will be apprx .750 third chamber 2" ending with the coned end cap. So that should keep close to the same volume as the multi flat baffle setup. Where it makes up for the slightly smaller volume will be the better air stripping and the first chamber venting into the outer wall and then to the outside. I will try the exact same first cone and outer chamber but no second baffle to gain more volume. So just two large chambers with that cone and outer chamber in the middle. I will report back how they compare to my other flat baffle designs.
That is a great design. What would production costs look like? If you took it to market?
If you want a stack of cone baffles, m or modified m baffles or k baffles you must increase length and or diameter over a simple thin flat baffle design to get the same level of sound moderation. Volume is king for air suppression and fancy baffles take up more volume. Anyone who has played with designs will know this to be true and the reason the smaller od huggets with basically no baffle at all just sound dampening material and internal volume are some of the best sounding mods. A moderator using the more elaborate designs will have to be 1.5" od and 6" to 8" long to get the same performance as a 1.5" od x 4" - 5" long moderator with no baffles or a couple simple flat baffles .200 thick for stability in the tube.
This is not what I have observed and measured. I agree that nine out of ten times you try to out perform an empty tube you can actually make things worse. That doesn't mean you can make a sweeping generalization that a sophisticated baffle design simply must be larger. If that were true there wouldn't be a baffle to be found in the silencer world. Clearly there are plenty of successful baffle based silencers in the market place. I have not observed (or measured) that increasing diameter to get more volume improves noise suppression significantly. I have observed (and measured) increasing length to increase volume definitely improves noise suppression.

Nobody ever wants to talk about performance over volume. decibels per CC that is the measurement of efficiency. I suppose you could also measure decibels per gram. Those parameters also matter. That is why we experiment with baffles. My K baffles are doing very well with the people who are testing them for me. They compare favorably with the Snipe (146cc) in a form factor which is admittedly 16% larger (169cc); however I have one that now out performs that specific model. It will be going into testing next week. It only has three baffles true, but they are a sophisticated cone design and are delivering about 3 dB improvement over that one in a package that is 14% smaller (126cc) than the Snipe.

I do hear you when you say it is hard to beat an empty tube. It really is. Cheaper to make, less materials, good performance. Hard to beat that package if you are trying to turn a profit.

I am still testing but my stack is growing. At this point I am testing the actual parameters of individual baffles. I make a small moderator of a constant volume, print one baffle in it and vary one characteristic of that baffle. Then I go to the bench and test. Rinse, repeat. I am finding that most of the gross assumptions we make ARE valid. Increasing volume DOES increase noise suppression but it is better to increase length to get that volume than to increase diameter. That agrees with our gross assumptions. Less baffles IS a good thing if the baffle is built correctly. It IS possible to use baffles to make an empty suppressor tube WORSE at noise suppression. It IS better to spread the baffles out rather than to bunch them up but ... well you get the idea... I MOSTLY agree with you. Just differ on a couple of minor points.
IMG_20220924_213858059_HDR.jpgstormy-test.jpg
 
Last edited:
  • Like
Reactions: LDP
That is a great design. What would production costs look like? If you took it to market?
Never thought about it much. Raw material cost would be around $15 or less. I can make a threaded end cap on a manual lathe in about 15 min. So lets say 45 min labor or an hour to make it even. The baffles take longer to print but you are not standing there working the printer like a manual lathe. The baffles cost 15 cents in material. Depending on the rate at which a person would charge for the machining it could be as little as $75. I also would not go into production using manual equipment. I would run it on a cnc lathe with dual spindles. What the production cost would be using that equipment I dont know. It would boil down to how many tubes and caps could be pumped out. I will ask the guys in the machine shop how many baffles and tubes they can crank out on that piece of equipment.
 
  • Like
Reactions: OldSpook
@OldSpook . Yes there are lots of things that will effect how well a particular design works and I shouldnt have made a blanket statement. In the past I didnt do controlled changes and just made new designs as my equipment improved allowing me to get more exotic if you will with design. Now that I can control dimensions to a tighter tolerance in my tubes and moving into threaded caps I can build different baffle designs without all the labor involved in manual turning them and the limitations that come with manual equipment. I may find some of my past experiences dont apply. I have 12" of 1.5" tube and 12" of 1.375" tube coming. I will be making test beds with both sizes. I will make a short and long version in both diameters and start my controlled testing. I will continue to share what I find in testing and collaborate with you and anyone else looking to explore improving air moderators.
 
  • Like
Reactions: OldSpook