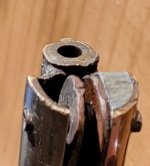
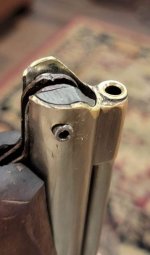
I'm thinking the problem with this valve is that it's either sticking, or the valve spring just needs to be beefed up?
That is a carpeted floor by the way.
That is a carpeted floor by the way.
Last edited:
I doubt it as it is a fresh rebuild.dirty ? could a pellet manufacturing shard have gotten in , and bouncing it dislodges the shard ? never had mine apart so this is just a guess .
I never mentioned it to him. The gun has been back and forth over there 4 times, and I think Tim would fold it half if he saw it again, not to mention it was damaged in shipping the last time.What did Tim say?
I will have to eventually open it up and have a look.I have a steroided benji , and a spare steroid valve. And the spring is softer than stock it seems as that makes pumping a little easier on the first few strokes. The rear pin seal is a different material than the stock one and the valve itself is machined to let it seat. It doesn't take much to get in between the two and cause a leak.
Both my valves are aluminum, Yours is brass so there may be some differences there on what he does to them. It's not the rubber rear seal so you can run some lube through it to flush it out and pump it up 10-12 time and leave it set. Hopefully your valve will seat into it. Good luck
Thank you Mike.To me, it almost sounds like the valve seat spring and the check valve spring is missing a flat washer (circled in blue) in between them and getting tangled with each other.
OR....the valve seat spring may be backwards, small end should be at the nipple of the valve seat, large end against that flat washer.
Besides, the check spring is pushing against the main spring, which is much heavier, so a heavier check spring would do no good IMO.
I really can't imagine Tim making such an error, but everyone is human.
Just my thoughts worth 2¢.
Mike
View attachment 454063
I will have to open it up to see apparently.In my imagination, yes, I can see somewhat of a relationship between the two.
I'm not certain, but I assume that the portion that holds the entire valve assembly is soldered in place inside the tube at the factory. It's a copper tube, how else could it be held in place?
If for some reason Tim overheated or had to heat that same area and a small spot of solder melted enough to slightly impinge upon the moving parts inside, it might be possible that one of those moving parts are initially out of place due to that melted solder and shaking/bouncing the rifle is enough to get that part past the melted solder and back into place.
This is really a WAG (Wild Ass Guess) on my part, but the only thing that I can think of.
Mike
Thanks Mike. I remember reading that you had soldered one."Looking at these pictures it seems that the air leak should have been further forward between the two gaskets?"
Perhaps. If the soldering operation got that area hot/warm it could also have melted a small portion of the lead seals if that's what Tim uses? Unless he took it apart when soldering (I would imagine that he did)?
In soldering, one would not just heat up the exact point of leakage, an 'area' would need to be heated in order to assure good adhesion with the rest of the already placed solder. I am a plumber by trade, so know very well how to solder.
I had to solder an oldish Dan a few weeks ago, which I had never done before. Once done, I saw that there was solder where it shouldn't have been inside the tube and had to file it out, instead of melting it out, which could have ruined the solder joint that I just made (make sense?). My solder blob wasn't in the valve area, closer to the hammer, which would not pass the blob that I made. Filing/sanding worked great, but tedious.
Again, these are my thoughts after my soldering experience.
You will definitely have to open her up to see what's going on in there.
Mike


Here's my drawing.That not the same rifle is it??
That IS hosed up! Some real handiwork going on there!
A plumber should easily be able to sweat those parts together without issue. I might recommend using a light brazing material on the butt x butt joint though, soft solder will likely not hold well enough to accommodate the extra load that the pump apparatus will put on that joint. That said, brazing requires a much higher heat, so the barrel will then need to be re-soldered and it will definitely melt.
You could also braze on the front sight at the same time as the tube brazing occurs.
Nice piece of work on the modified tube extension!
Have fun.
Mike
Yes Sir.Sounds to me like you are going to try to fix it yourself. Let us know what you find.
Thanks I'm very fortunate to have someone to converse with about it. My experience with soldering is in guitar, amplifier, construction and repair."Should the gun be stripped of finish, under the slip coupling?"
When it comes to soldering, cleanliness is king. Flux can clean some, that's why it's also called "acid", but the cleaner the substrate, the better. It also helps the bond when emery-cloth or sand-cloth is used to sand the areas as it leaves minute scratches in the material helping it bond better.
I have no idea what type of solder the factory uses and from my understanding, lead free plumbing solder has been adopted across the USA (thank Komiefornia for that).
So, in order to make it as simple as possible, I would recommend using the smaller wire (something that you would use with a soldering iron for wiring), non-flux core, as it is likely 50-50 solder. Much more pure lead than the current plumbing solder and MUCH easier to make a solid joint....unless of course you are brazing.
A brazed joint is MUCH stronger, as it has a higher heat and changes the base material somewhat because is needs to be orange hot. Therein lies an issue with brazing however, orange hot anneals the metal making it softer and more pliable. Easily dented and likely will not hold up to the pumping action.
So, you are on the right track making it a socket joinery method and using the small wire solder. That way, the high heat goes away.
Steps:
1.) Clean any finish off of the area to be soldered.
2.) Sand those same areas to scuff it up.
3.) Use a brushed-on flux (not flux core solder). Flux does 2 things; A.) It protects the material from oxidizing. B.) It acts as a 'lubricant' for the solder to follow. It only needs a light coating, don't go hog-wild with it. It'll just drip and make things ugly.
4.) Wipe off any excess flux from the outside of the joint before soldering, otherwise it will drip and the solder will follow it making for a very ugly joint on the outside.
5.) There is no need for high heat, a small torch will work just fine, the smaller the tip, the better. This will be super easy to control the heat and concentrate EXACTLY where you want the solder to flow. ALWAYS have the heat source where you wish the solder to flow, it's called capillary action and the solder will flow to the heat, even upside-down. It will take a little longer to heat up, but trust me, the control that you will have will be rewarded with a MUCH cleaner looking joint.
6.) Let it cool slightly, then wipe off any excess material, such as minor flux or solder. It should still be very warm, but not hot when doing so, which aids in a cleaner wipe. You just don't wanna wipe it and move the solder/joint at all. Usually about 45-60 seconds is ample time to cool enough.
7.) Yer done!
If you are having your Master Plumber brother doing the work, he'll understand the above completely.
PLEASE, lemme know how it turns out.
Mike