TX200HC .177 Walnut - Project Overview

"Jospap"Hi Steve:
Could you gave us some more details on the finishing process to your Tx stock? I would really love to finish my Tx stock the way you did with yours.
Regards from Mexico
José Palma


Hi Jose, here you go!

TX stock refinishing;

First off, the TX walnut stocks make for an easy job. They are finished to near perfection right from the factory. Here is my process;

Remove recoil pad
Scrub stock with soft cotton rag soaked with denatured alcohol to remove any oils

Before sanding read up on the "Rays" in walnut stocks. Sometimes it is hard to determine grain direction, using the Rays in the grain will help

lightly sand stock (with the grain) using 400-600 grit - stay out of the checkering!
lightly wipe stock with soft cotton rag soaked with warm water - this will raise grain
Allow to dry, then very lightly sand the raised whiskers off with 400-600 grit - again, with the grain and do not touch the checkering
Wipe with denatured alcohol again
Allow to dry

Begin to apply Royal London Oil;

Dip a soft cotton rag in the London Oil and work it in liberally one small section at a time (for example, wipe it into the cheek piece) - wipe with the grain and do not allow to dry!
Immediately take a clean cotton rag and wipe excess off of that area, buffing lightly with the grain, flipping rag over often

Move to another area and repeat until entire stock has been coated in this manner
Allow to dry a minimum of 4 hours before next coat

I apply 4-5 coats on most stocks. The more you apply, the glossier it will get. I prefer only a mild sheen, so 4-5 works for me

After last coat is applied, alow stock to fully cure for 5-6 days

Lightly wipe stock with Maccari Sock Mud - with the grain. This will buff out any imperfections in the finish and will also blend the surface

Apply 2-3 coats of Minwax paste finishing wax and you are done!
 
  • Like
Reactions: Wadcutter
"Jadocs"I’d like to know as well. I tried to look up the parts list and had limited success, would you happen to also have links of where you got them?


Here you go!

OK, here are the links for accessories that went into this rifle;

Royal London Oil

http://www.airrifleheadquarters.com/catalog/item/251486/42975.htm

Stock Mud

http://www.airrifleheadquarters.com/catalog/item/251486/859020.htm

Spring

http://www.airrifleheadquarters.com/catalog/item/251488/7905117.htm

Main Seal

http://www.airrifleheadquarters.com/catalog/item/251485/1390459.htm

Breech Seals

http://www.airrifleheadquarters.com/catalog/item/251485/797948.htm

Forearm Bracket

Stainless (this is the one I used on this rifle) - http://www.airrifleheadquarters.com/catalog/item/8000185/10349751.htm

Forged - http://www.airrifleheadquarters.com/catalog/item/251488/9167004.htm

Cocking shoe
- currently unavailable

Cocking Handle, Trigger and Trigger Guard

http://www.rowanengineering.com/products6.htm#triggers
 
"Nitrocrushr"
"Jospap"Hi Steve:
Could you gave us some more details on the finishing process to your Tx stock? I would really love to finish my Tx stock the way you did with yours.
Regards from Mexico
José Palma

Hi Jose, here you go!
TX stock refinishing;
First off, the TX walnut stocks make for an easy job. They are finished to near perfection right from the factory. Here is my process;
Remove recoil pad
Scrub stock with soft cotton rag soaked with denatured alcohol to remove any oils
Before sanding read up on the "Rays" in walnut stocks. Sometimes it is hard to determine grain direction, using the Rays in the grain will help
lightly sand stock (with the grain) using 400-600 grit - stay out of the checkering!
lightly wipe stock with soft cotton rag soaked with warm water - this will raise grain
Allow to dry, then very lightly sand the raised whiskers off with 400-600 grit - again, with the grain and do not touch the checkering
Wipe with denatured alcohol again
Allow to dry
Begin to apply Royal London Oil;
Dip a soft cotton rag in the London Oil and work it in liberally one small section at a time (for example, wipe it into the cheek piece) - wipe with the grain and do not allow to dry!
Immediately take a clean cotton rag and wipe excess off of that area, buffing lightly with the grain, flipping rag over often
Move to another area and repeat until entire stock has been coated in this manner
Allow to dry a minimum of 4 hours before next coat
I apply 4-5 coats on most stocks. The more you apply, the glossier it will get. I prefer only a mild sheen, so 4-5 works for me
After last coat is applied, alow stock to fully cure for 5-6 days
Lightly wipe stock with Maccari Sock Mud - with the grain. This will buff out any imperfections in the finish and will also blend the surface
Apply 2-3 coats of Minwax paste finishing wax and you are done!
Hi Steve:

Thank you very much man, this is a very useful information, I´m sure that many of us appreciate your gesture by sharing it.

King regards

José Palma

 
"Bogey47"Your “project” is more than that. It is a metamorphosis. I would like to say put me down for third dibs, but it would never get that far. On second thought,have you ever thought about doing your magic professionally? A lot of us less talented guys would like to shoot/own a treasure like that. PS Can you tell I thought your post was great? I’m your newest fan.


Thank you!! I have built a few rifles for others, and sold 4 or 5 of my personally tuned springers....but haven't pursued doing it as a side hobby yet. As you can tell I really enjoy these projects, and even more so sharing the fun with others in my detailed overviews. I think it can help to build some passion into our sport of airgunning. These projects get my full attention until complete. Being somewhat of a perfectionist it can become unnerving at times but the end result makes it all worthwhile! The hardest thing is letting them go when I am done....but I may keep this one for a while. I say that almost every time though...lol. I have you down for 3rd dibs should I decide to sell!

Steve 
 
Quick update

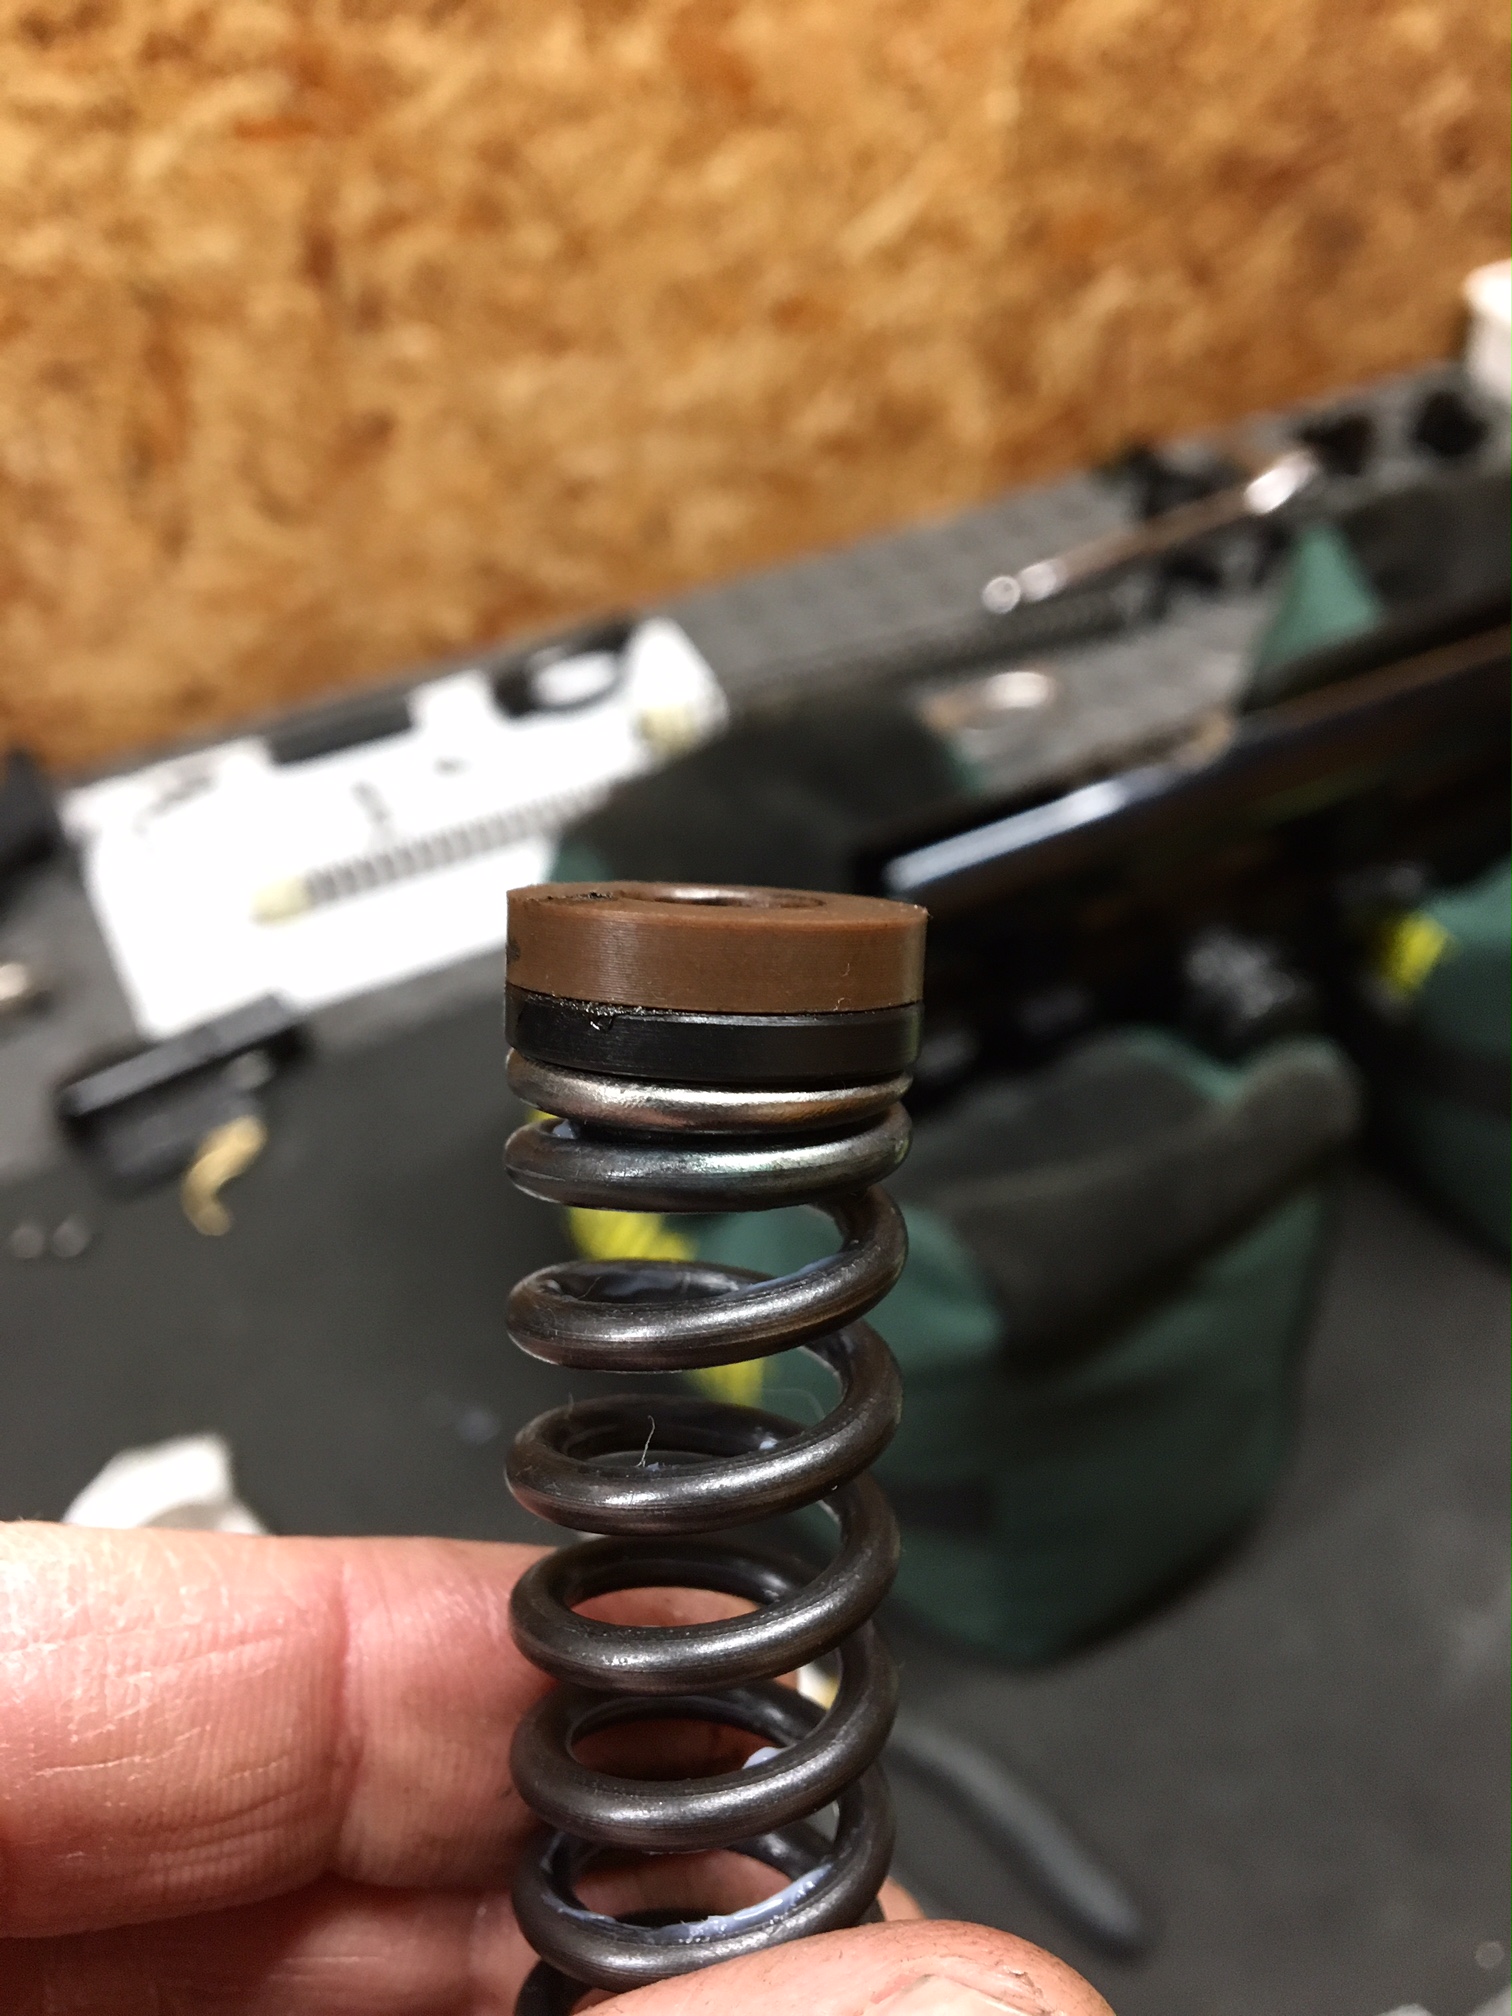
The QX4600 continued to hold strong at over 12 fpe even with no top hat. Not a bad thing, but I know the additional smoothness these rifles have when approaching the low 11fpe range. So, I removed 1 coil from the QX4600. Without a top hat, this took me down into the 10 fpe range. I then installed the 3mm delrin top hat that Motorhead made for this spring and experimented with various thickness delrin washers on top of that until I got to the fpe range I was looking for. The final combination is;

QX4600 minus 1 coil
3mm delrin top hat plus 2mm delrin spacer for a total of 5mm of top hat thickness

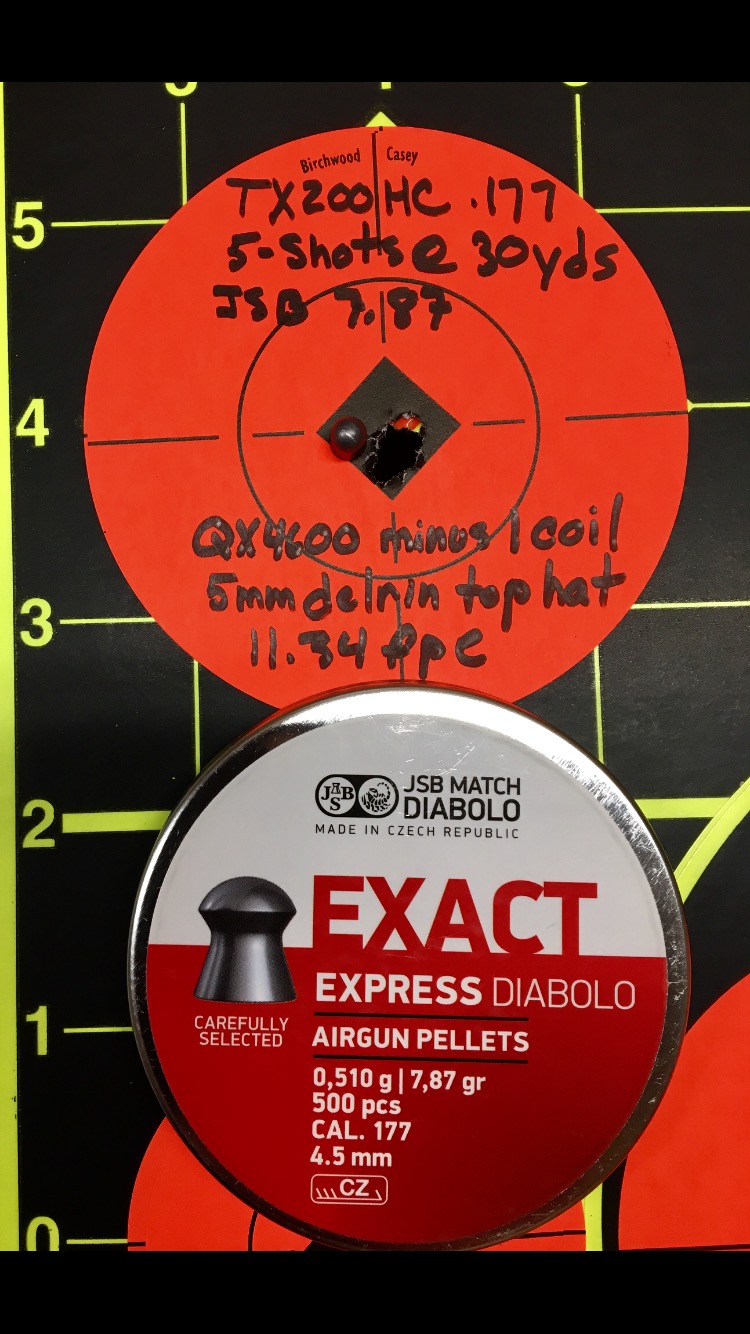
End result is giving me 11.34 fpe

JSB 7.87
Weighed at 7.94 grains = 802 fps = 11.34 fpe

The rifle is even sweeter shooting than it was before....so smooooth! Most recent shot string showed ES 9 and SD 2. The shot cycle is a dull thud and pellet on turret test passes with ease with pellet remaining in the center of scope cap. Barrel is staying clean with only 2 dry patches on the crown saver being needed for cleaning. First patch comes out dirty and 2nd patch is almost clean, no fouling issues whatsoever....another benefit of the lower fpe builds.


Here is a picture of the finished spring with 1 coil removed. In this picture I have motorhead's 3mm delrin top hat plus a 4.4mm delrin spacer. I later replaced this spacer with a thinner 2mm spacer.


Cold off the rack here are 5-shots at 30 yards from this morning. Single sandbag on bench. First group, no warm up and a 3-5 mph breeze, so conditions were not calm.

What's even more satisfying than seeing the rifle hold a tight group like this in a 3-5 mph breeze, is being able to shift around the target to various spots and maintain POI. Whether I picked a spot at the top of the target, or the bottom of the target, the rifle maintained POI

This power plant is complete. In the very near future I will be testing a 22mm skirtless conversion from Tony Leach in this rifle. He already has my spare compression tube. Just waiting for the call when it is complete. It will be an easy test with no disruption of the work already completed. The existing comp tube, piston and spring will be pulled and set aside as a complete unit, and the 22mm kit from Tony Leach will drop right in.

30yardsQX4600minus1c.jpg


Steve
 
"Wadcutter"Outstanding write up on your TX enhancements. AA does seem to come up with nice lumber but their factory finishes lack that depth and sheen you get from a nice oil rubbed finish. RLO was a good choice: I am a big fan also. Looks fantastic.


Thanks! Yes AA has some beautifully detaild grain on their walnut stocks. Some better than others, kind of like winning the walnut lottery on the really nice ones. I started using RLO a couple years ago and have had no desire to change. It is easy to work with and adds depth to the grain. I like how it works into the stock rather than sitting on top, and yu can gauge whether to go satin or shiney based on how many coats you apply. I like the medium shine and 4-5 coats seems to do it.
 
"Butch"Awesome outcome and write up Steve. Question for you though. The QX4600 spring you are using does not appear to be available at ARH. They have a link below that spring for an updated version (larger gauge wire though). Do you know where I could order the QX spring you are using? Been searching with no luck.
Thanks, Butch


Thanks Butch! I would email James Maccari to see if and when he is planning on making up more of the QX4600's. 

The QX4600 is the best choice in my opinion. I also purchased one of the new updated springs that he is offering, but they are too strong for the sub 12 fpe builds. The QX4600 has .120" wire for a nice soft shot cycle, whereas the updated versions have thicker .125" wire. THey are softer than the stock AA 130" spring, but not as soft as the QX4600.

I'm glad I picked up a spare spring while he had them in stock! I hope he is planning on making them again for the sake of folks looking to soften up their TX and PS's.

Steve
 
Hey Steve 

"Polished the bore using JB non-embedding bore paste. Not a necessity, but can reduce chances for fouling by smoothing out any roughness in the bore. I work from the breech to muzzle and while I work into the choke a bit, I do not allow the jag to pass completely out of the crown. It is important to keep a nice crisp edge on the crown"

Was hoping you could expand a little more on this process. like how many stokes did you do? is that felt pellet anything special ? I am new to this so sorry for the rooky questions . I am assuming you just go up and down and stay away from coming out of the end barrel as its to risky to damage the crown? 

I have read a lot people recommend a brass brush but I like the looks of that felt tip you have in the picture much better for some reason 

any tips on this process would be greatly appreciated. 

that thing still aint as good as your 98 is it LOL ;)

thanks
Dave 
 
"davemac18"Hey Steve 
"Polished the bore using JB non-embedding bore paste. Not a necessity, but can reduce chances for fouling by smoothing out any roughness in the bore. I work from the breech to muzzle and while I work into the choke a bit, I do not allow the jag to pass completely out of the crown. It is important to keep a nice crisp edge on the crown"
Was hoping you could expand a little more on this process. like how many stokes did you do? is that felt pellet anything special ? I am new to this so sorry for the rooky questions . I am assuming you just go up and down and stay away from coming out of the end barrel as its to risky to damage the crown? 
I have read a lot people recommend a brass brush but I like the looks of that felt tip you have in the picture much better for some reason 
any tips on this process would be greatly appreciated. 
that thing still aint as good as your 98 is it LOL ;)
thanks
Dave


Hi Dave, I use the felt cleaning pellets and brass jag from VFG screwed onto a dewey coated rod. With comp tube assembly removed from the rifle I work from the breech end. I soak the pellet with light oil (Hoppes). I then smear the pellet liberally with the JB paste. I then insert into the breech and slowly work to the end of barrel where i can feel the choke just beginning to tighten, I then place a piece of tape around the rod right at the back of the receiver. This gives me a reference so I know the stopping point. I then begin working the flt pellet back and forth quickly with strokes of about 1-1.5" long, while at the same time slowly working back towards the breech. When I reach the breach, I slowly insert rod up to the tape line and start over. I repeat this process about 3-4 times. I then pull pellet back out and add some more JB paste. Next, I make 3-4 complete passes from the tape line back to breech. That's it for the JB polishing. Next I clean the bore. I pull 5-6 patches through bore with my crown saver until relatively clean. I then dampen a patch with acetone and pull throgh the bore, being careful not to get any on the bluing. Squeeze out any excess from the patch before this step to keep it from dripping. Repeat with another acetone dampened patch if necessary, followed by several dry patches and you're done.

From that point on I maintain the bore with dry patches only, no solvents or brushes unless I have reason to do so. I will run 3 dry patches through the bore about every 50 shots for the first 200 shots, and then bump this up to a couple dry patches every 100 shots or so. This helps to maintain a nice polished film of lead in the bore. As mentioned above, this barrel requires only 2 patches to clean. First one has some blackening on it, and the 2nd patch is almost clean. I actually use .22 patches and trim them down just a tad bit, so they have a snug fit in the bore.

As far s the HW98 compared to this TX......well......I'd have to give the nod to this TX. It really is shooting incredibly well, and so darn smooth. The stroke is longer than the 98, which makes for a smoother shot, whereas the 98 has a more abrupt shot cycle even with the 12 fpe kit. Just has more of a jump on the shot. Plus, the TX stock fits me much better. Better contour for the trigger hand and better fit overall. The 98 is still a very sweet shooter tough.

Hope ths helps!

Steve
 
"Nitrocrushr"Any other PCP shooters ever had this same feeling?
Yes, I completely recognise your feelings. Exactly the same reasons why I got myself a TX200 also a while ago. Thanks for sharing your experiences mate, huge thumbs up for the work and writing. I guess I'm going to have to do some work on mine reading this.