Tuning Umarex Notos has arrived.

Yes i don't use the factory shroud as I made my own. For the .177 I used 3D printed cones for the Umarex origin and for the .22 I use five cones from the Marauder rifle. For scope, I use an dovetail to picatinny adapter on the front side. The back I cut a piece of blank picatinny rail. All of this is on the Umarex Owners group on facebook under George Barber as I don't have an account on facebook. I just finished a drop block series for those that want to make it with just hand tools. My .22 now has 15" barrel and the .177" is 16" long.
I don't do Facebook, but can I go there to see pictures or do you have to sign up? I'm curious about the 3d printed parts.. is there a place that does it for you or do a lot of people have 3d printers? are they expensive or hard to work? I can print out a email on the printer but I assume that it's a lot different printing out a 3d part.. I have my own machine shop and I have done machine work and mechanics and welding my whole life.. wish I had more time to play with the welder and machine tools now that I am retired but I don't seem to have as much time as I had when working.. but all my machine tools are old fashioned.. nothing digital other than the calipers.. my lathe is actually a craftsman probably my age if not older..
you really have me interested in what you are doing.. let me know how to see the pictures and information you have posted..
thank you so much for sharing what you are doing
Mark
If you know someone with facebook, ask them to go to Umarex Owners Group. Like you I am old school, I just got back into the forum after being away since the yellow forum was shot down. My niece helped me upload some pictures here a few pages back. I'm a retired micro machinist but I started on conventional machines in the U.S. Navy.
 
  • Like
Reactions: JaceSpace1369
If you know someone with facebook, ask them to go to Umarex Owners Group. Like you I am old school, I just got back into the forum after being away since the yellow forum was shot down. My niece helped me upload some pictures here a few pages back. I'm a retired micro machinist but I started on conventional machines in the U.S. Navy.
I can't find any of the pictures.. I'm still trying to learn how to get around the forum.. I'm sorry, is there any way you can send me a link to your pictures?
Mark
 
Pins are vertical on my late May 2023 delivery. Appreciate everyone's help.

The Notos is very quiet stock, but it is now silent - minus the target and the hammer.

pushed out from bottom - knurled ends on top:
knurled.jpg
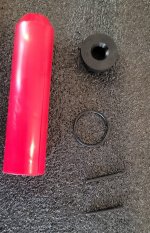
insider, o-ring, and cap which are no longer in use:
oldmod.jpg
Added 2 o-rings to the printed insert with some dielectric grease. pins back in:
newmod.jpg
 
Notos in hand.
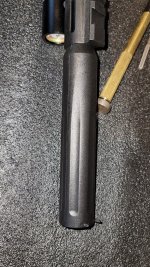
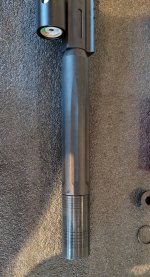
Attached are two pictures of the moderator.
One is from the top and the other is from the bottom.
The bottom has the circle shape between the pin holes.
I assumed the pins went top / bottom or bottom / top. However, perhaps they go side to side (left / right).
Is anyone able to confirm looking at these pictures?

View attachment 359737

View attachment 359738
they look just like mine.. I don't remember what end was knurled but I drove them out the top.. I noticed someone else said that their notos was side to side.. so maybe his was a more recent batch? because if you remove the barrel you have to be sure to get it back straight up and down otherwise the air transfer port will not align. it did take a pretty good hit on a good quality pin punch to get it started.
Mark
Thanks. I posted above.

Took about 2 minutes to get the pins out and switch the insert. I have a good set of punches from building several other types of powder burners.

Took another couple minutes to get the pins back in - I pushed the pins through the 3D printed insert a few times before inserting as it was quite tight in the print (a good thing).

Hardest part was making sure not to scratch the area around the pin holes.
did you make your own extension and baffles insert? I guess a lot of people talk about 3d printing them.. not familiar with 3d printers, do you get it printed somewhere or do you actually have a 3d printer.. I figured that they would be expensive and commercial things that only business would have to work.
do you have pictures of the inserts you have inside?
I've been on the fence about putting a moderator on my blitz 22 they are a lot of money and I have read of several people that put them on and they won't cycle in semi auto, turned it into a bolt action
mark
A lot of questions there...hope to answer them all.
I did not design the Notos insert - an individual that goes by 'subscriber' did.
I printed one of subscriber's Notos designs. There are 2 that I am aware of from his designs.
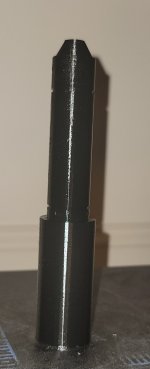
Below is the one I printed. This design is internal and external of the Notos - internal portion is the thinner area. It is one solid piece - not pieces like the Notos stock insert.
20230412_215627.jpg

The internals of that 3D print look like this:
Notos O-ring fit insert2.JPG
 
First time diving into a gun and need a little help.
What's the best way to degas the Notos?
Can I fire it to 0psi? Or do I have to slowly unscrew the gauge (like I've seen done on PP750's) until it leaks out?

I assume I should have spare o-rings at the ready? Do they need to be a specific kind of material? Or will any do as long as it's the right size and thickness?

FWIW - I'm adding a gauge block from airgunarcheryfun.ca
Manaul tells us to dry fire until empty. I will be in the same boat with the Guage block. Hope you can share your journey.
 
First time diving into a gun and need a little help.
What's the best way to degas the Notos?
Can I fire it to 0psi? Or do I have to slowly unscrew the gauge (like I've seen done on PP750's) until it leaks out?

I assume I should have spare o-rings at the ready? Do they need to be a specific kind of material? Or will any do as long as it's the right size and thickness?

FWIW - I'm adding a gauge block from airgunarcheryfun.ca
Yes I have dry fired mine until empty to replace the tank. Just got my second Notos yesterday and I'm installing a drop block for bottle. This will be turned into a .177 cal. 16" barrel. When the pressure gets low enough the hammer spring will dump the remaining air through the barrel. Then it's easy to unscrew the tank.