Tuning Umarex Notos has arrived.

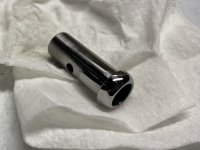
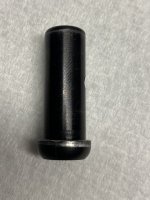
I have had a couple instances of the cocking handle feeling like it is binding up? Anyone else had that? I found some small grooves worn inside the hole where the bolt rides and have smoothed it out with 600 grit sandpaper and cleaned and lubricated everything with Ballistol and that seemed to make it cock even smoother than before. Then after putting maybe another 100 pellets through it, it began getting harder and harder to cycle the side lever again… felt like it was binding. Took it apart and searched everything and could only find some scuffs on the bolt itself but nothing super obvious…. went over it again with 600 grit and this time chucked the bolt into the drill press and lightly dressed it up as well with the sandpaper. Cleaned and lubed with Ballistol again and it’s back to perfect. Cycles like hot butter now.
 
Well my girl beat me tonight lol, love this gun it’s so fun can’t wait to stretch her out!!

7D4FF090-478B-4161-919C-6165019E04C3.jpeg
 
I have had a couple instances of the cocking handle feeling like it is binding up? Anyone else had that? I found some small grooves worn inside the hole where the bolt rides and have smoothed it out with 600 grit sandpaper and cleaned and lubricated everything with Ballistol and that seemed to make it cock even smoother than before. Then after putting maybe another 100 pellets through it, it began getting harder and harder to cycle the side lever again… felt like it was binding. Took it apart and searched everything and could only find some scuffs on the bolt itself but nothing super obvious…. went over it again with 600 grit and this time chucked the bolt into the drill press and lightly dressed it up as well with the sandpaper. Cleaned and lubed with Ballistol again and it’s back to perfect. Cycles like hot butter now.
Does the hammer look anything like this?
20230121_161646.jpg


After I started sanding it, I saw a bunch of machined lines that you could not see before.
20230121_162233.jpg


So I polished it a bit more...

20230121_163508.jpg


This guns cocking felt like sand was in there. Not anymore! Well let's see how long it lasts first.

Disclaimer, this is on the PP750 not the Notos. I will find out soon enough if they are the same.


Allen
 
Last edited:
  • Like
Reactions: pnwairgunner
Does the hammer look anything like this?
View attachment 325441

After I started sanding it, I saw a bunch of machined lines that you could not see before.
View attachment 325443

So I polished it a bit more...

View attachment 325450

This guns cocking felt like sand was in there. Not anymore! Well let's see how long it lasts first.

Disclaimer, this is on the PP750 not the Notos. I will find out soon enough if they are the same.


Allen
Yes it looks the same. I’ll polish it also next time I have it apart and see what it feels like.
 
Does the hammer look anything like this?
View attachment 325441

After I started sanding it, I saw a bunch of machined lines that you could not see before.
View attachment 325443

So I polished it a bit more...

View attachment 325450

This guns cocking felt like sand was in there. Not anymore! Well let's see how long it lasts first.

Disclaimer, this is on the PP750 not the Notos. I will find out soon enough if they are the same.


Allen
900E96B3-C438-4F8F-A6DE-CE43D7ED5B8F.jpegD7374D0D-B12B-4EBB-9B9D-C13EF6A293F5.jpeg
Pulled the hammer and gave it a quick polish. Shot one magazine afterwards but I was losing daylight. I think I’m going to have to back off my hammer spring adjustment a little more as it is sounding like the valve is open just a touch too long now.
Also adjusted the trigger more and have it at a spot that feels pretty darn good now.
Time for me to put it up til next weekend.
 
  • Like
Reactions: Healthservices
It was available for the pp750. But currently the machine shop that makes them for one of the vendors has not started another run and the vendor is currently out of them. I'm not sure if the factory moderator would clear. And that's the reason the beauty ring is taken off. It does make adjusting the reg so much easier when you know what presure you are at.


Allen
 
Last edited:
  • Like
Reactions: pnwairgunner
So one and the same but with some very notable differences.
Of course the cocking handle is on different side.
Safety is opposite side, which kind of bothers me as I am used to the safety being pushed to left.
Trigger only has one adjustment on the outside there is a adjustment inside.

To me at least on this one you need adjustable rings because if you put the rear ring behind the mag, POI is low. At least with this scope. Then you have to shim up the rear or have the scope near the bottom of the elevation adjustment to work.

Allen
I have used the bugbuster scope with the included rings and no shim was necessary. That bottom rail is awesome. I’m going to see if I can find that. I’d really like to have hand guard made that goes over the tube and adds a little bit more thickness to hold onto.
 
Moderator is definitely not removable, its held on by two c clips that are molded into the plastic.
Can obviously be cut off but you will need access to a 3D printer to make some parts.
First off,the barrel is not threaded on either end,held by a grub screw on top of the block just underneath the screw to remove pic rail.
After removal, the whole barrel assembly should just slide off.
The barrel shroud is a slip on fit only and was held on by the Moderator.
Just need to hack off the Moderator if desired and find or make a slip on version.
20230110_171727-1.jpg
20230110_171715.jpg
20230111_201434.jpg
20230111_201341.jpg
20230111_200554.jpg


So the notos is a different build than the pp750 and has many different parts..

Now the gun shoots awesome but is very loud without a Moderator. Good luck.
 
Moderator is definitely not removable, its held on by two c clips that are molded into the plastic.
Can obviously be cut off but you will need access to a 3D printer to make some parts.
First off,the barrel is not threaded on either end,held by a grub screw on top of the block just underneath the screw to remove pic rail.
After removal, the whole barrel assembly should just slide off.
The barrel shroud is a slip on fit only and was held on by the Moderator.
Just need to hack off the Moderator if desired and find or make a slip on version. View attachment 325772View attachment 325773View attachment 325774View attachment 325775View attachment 325776

So the notos is a different build than the pp750 and has many different parts..

Now the gun shoots awesome but is very loud without a Moderator. Good luck.
Oh,and that small pin on the bottom of the Moderator is a complete trap, it does absolutely nothing. But the two front pins can be removed to access the Moderator baffling
 
Oh,and that small pin on the bottom of the Moderator is a complete trap, it does absolutely nothing. But the two front pins can be removed to access the Moderator baffling
So does shroud do any silencing? The barrel is full length then no wonder it has decent power compared to the pp750.

Allen
 
  • Like
Reactions: pnwairgunner
Moderator is definitely not removable, its held on by two c clips that are molded into the plastic.
Can obviously be cut off but you will need access to a 3D printer to make some parts.
First off,the barrel is not threaded on either end,held by a grub screw on top of the block just underneath the screw to remove pic rail.
After removal, the whole barrel assembly should just slide off.
The barrel shroud is a slip on fit only and was held on by the Moderator.
Just need to hack off the Moderator if desired and find or make a slip on version. View attachment 325772View attachment 325773View attachment 325774View attachment 325775View attachment 325776

So the notos is a different build than the pp750 and has many different parts..

Now the gun shoots awesome but is very loud without a Moderator. Good luck.
Hmm so the barrel slides in rather than threadEd like the pp750.

The pp750
20230122_221743.jpg


20230122_222135.jpg


And here I was hoping to put a 177 barrel in the notos.

Did you by chance measure the outside diameter of the barrel?


Allen
 
  • Like
Reactions: pnwairgunner
  • Like
Reactions: pnwairgunner
Moderator is definitely not removable, its held on by two c clips that are molded into the plastic.
Can obviously be cut off but you will need access to a 3D printer to make some parts.
First off,the barrel is not threaded on either end,held by a grub screw on top of the block just underneath the screw to remove pic rail.
After removal, the whole barrel assembly should just slide off.
The barrel shroud is a slip on fit only and was held on by the Moderator.
Just need to hack off the Moderator if desired and find or make a slip on version. View attachment 325772View attachment 325773View attachment 325774View attachment 325775View attachment 325776

So the notos is a different build than the pp750 and has many different parts..

Now the gun shoots awesome but is very loud without a Moderator. Good luck.
Sweet!! Thanks for taking the plunge first and tearing up a perfectly good pellet gun. I have been sorely tempted but for once I have exercised restraint hahaha! I didn’t want to destroy anything only to find out there was a non destructive way to go about it.
Well I suppose me trying to unthread the barrel from the receiver last week did nothing but probably wear a groove on the barrel under the grub screw…. I was totally expecting it to be threaded in and I’m a little disappointed that it isn’t. Oh well.
Where is the transfer port located in relation to that grub screw?
 
Awesome thank you boomstrike for the info!! I did take off the barrel, you’ll need a 2 mm Allen key! I think I’ll try some porting this weekend the barrel port is 3.5 mm so maybe open all ports to 4 mm might give some extra power. I’m gonna leave the moderator on because it works so well for me. I think all we have to do is but a different barrel with the 1/2 x 20 threading on.
The transfer port is closer to breech opening I think it will be easy to drill from bottom.