You are using an out of date browser. It may not display this or other websites correctly.
You should upgrade or use an alternative browser.
You should upgrade or use an alternative browser.
What pistol did you shoot today
- Thread starter Septicdeath
- Start date
My new 0.22 thug arrived today, only just had time to check the power; 5.5 ftlbs on full power and 3.5 ftlbs on the low power setting, not that I will be using that option much.
Feels great with the Hogue grip.


Feels great with the Hogue grip.
Upvote 0
Ahh, ok. I thought it might be an airgun. Remingtons have always been handsome gunsRemington chambered in 45 colt
Upvote 0
Rate of fire was a bit excessive IMO, faster than a real Uzi.Got the Guarder metal kit for the Mini Uzi.
These parts are cast aluminum.
The Mini Uzi comes in an Airsoft version as well as the .177 BB gun shown here. Nobody seemed able (or willing) to confirm if this kit would fit the BB gun, nor could they detail what the differences in the two versions might be. Once again the buyer is on their own. But of course.
Although the gun is advertised as all metal, that's not true. The internals are metal and quite stout, as are some exterior details, but the upper & lower receiver housings are ABS plastic.
The aluminum upper comes in two halves, while the original plastic upper is one piece.
View attachment 532900View attachment 532901
The metal parts omit the "Made In Taiwan" logo, and add other details.
Grip is in place on the new housing to check the fit ...
View attachment 532902View attachment 532903
The first step in making the swap is getting the thing apart. All pretty straightforward until you get to the rear sight, which must be removed to pull the inner frame out. And the first step in getting the sight off is to remove the tiny oddball set screw shown below. This takes a 0.9mm hex key, nothing you'll find in any average hex key set. After all, it just wouldn't DO to use a more commonly available screw size.
View attachment 532904
After removing all the screws in the bottom of the plastic housing, the plastic must be flexed a bit to get the inner frame out. That's when you discover the elongated alignment pins cast into the housing. These fit into the metal inner frame and lock it into position. The housing must therefore be flexed to allow the frame to pass over these pins and come out.
Now it gets interesting.
The aluminum frame also has these pins. They're both cast in the right side upper receiver.
The metal housing is not going to flex like the plastic, and attempting to do so would probably break something.
Not a very well thought out design.
View attachment 532905
This shows the metal right side upper and the internals that have to mate up with it.
Note the two elongated pins and corresponding slots.
View attachment 532906
I filed this pin down to about 1/4 of it's original height. That limited the amount of flex needed to get everything to snap into place.
In retrospect I should have also filed down the other pin. As it stands, getting everything apart again means flexing that housing more than I feel comfortable doing. A better design would have been to eliminate these pins altogether and use several screws up through the bottom of the housing.
View attachment 532907View attachment 532908
Next issue ... not all the holes are drilled correctly.
As shown below, one screw wants to go in crooked. Had to stretch the hole in the housing to get it to go in straight.
Always test fit stuff
View attachment 532909
To get the left side upper in position, the instructions (online, such as they are) say to remove two small round pins molded into the right side upper, and they indicate exactly which pins. I carefully filed them off. This isn't optional. Attempting to flex the housing over these pins will almost certainly crack the housing. Also, do not tighten up any screws until the left side is in position, this allows more wiggle room.
And finally, when everything was back together, the magazine wouldn't stay in. The mag latch didn't latch.
Oddly, it did when I assembled the lower receiver by itself.
But there's maybe 0.010" difference in the height of the plastic and aluminum lower housings, just enough that the mag tops out against the upper frame, and doesn't quite allow the latch to engage. Turned out to be an easy fix .... just filed a bit off the top of the mag latch.
View attachment 532910
Done. And working properly. Success!
Now it's an all-metal gun.
View attachment 532912
When they say it's not an easy kit, they're right. But that's not because it's complex, it's actually a pretty simple gun.
IMO the problem stems from the fact that the kit has a few basic flaws, which can be successfully managed IF one knows in advance.
View attachment 532911
Added some lead shot inside the bolt and this slowed the ROF to a realistic rate.
Now it's possible to fire full auto in a controlled manner, and not worry about accidentally dumping the whole mag.
Update ... jamming
Seems like it worked for a while but after changing BBs it started jamming relentlessly.
This all-metal kit is designed for 6mm, not 4.5mm BBs, something that no one seemed able to confirm ... until now. And the only difference is with the loading ramp. This is not readily apparent, mostly because said ramp is in two halves .... the upper receiver comes in two halves, with half of the loading ramp residing in each side. It's not until both halves are put together that the loading ramp is "complete" and you can test whether a BB will actually roll up the ramp and into the breech.
The ramp rails are just under .177" apart. This will guide a 6mm BB but 4.5mm BBs sometimes fall between the ramp rails, causing the gun to jam. The solution is to attach shims to the insides of the ramp to narrow the gap. These shims must follow the existing ramp slope . A bit of JB Weld and some 0.015" brass shim stock serves nicely. This is best done with the upper receiver disassembled back into its original two halves.
Of course, if the manufacturer had simply spaced the ramp rails slightly closer then this kit would work for both 6mm and 4.5mm, but of course that would make too much sense.
Upvote 0
When nothing less that total insanity will suffice ..... 
Today I chrono'd the MP40.
450+ fps with Black Diamonds. This thing rips targets to shreds.
On full auto the rate of fire is slow enough that you can count the shots, much like the real thing. Good stuff!
It helps to swap mags between bursts to let each mag warm back up a little.
Yes, it cuts through BBs and CO2 like crazy, but so worth it!
Of all my select-fire stuff this is my fav.
Upvote 0
All my select fire BB guns are for “snake patrol”. I want lots of firepower for a short distance, and the cheaper the ammo the better. This niche is where certain BB guns can shine. Not just a toy anymoreWhen nothing less that total insanity will suffice .....
Today I chrono'd the MP40.
450+ fps with Black Diamonds. This thing rips targets to shreds.
On full auto the rate of fire is slow enough that you can count the shots, much like the real thing. Good stuff!
It helps to swap mags between bursts to let each mag warm back up a little.
Yes, it cuts through BBs and CO2 like crazy, but so worth it!
Of all my select-fire stuff this is my fav.
View attachment 536375
Upvote 0
I shot the Daisy 717, which is settling in to being a fine little pistol. It had been leaking on the first few shots after the repair, but has been rock solid on the last two shoots with it. 

Upvote 0
First proper session at 10m with the HW45, quite pleased to keep most of the shots in the black - after a bit of practice and some tweaking of the sight...

Upvote 0
There’s a nice folding stock made for these. I understand it requires a different front sight be used as it drastically changes the HW45’s kick and causes the gun to shoot high (?).First proper session at 10m with the HW45, quite pleased to keep most of the shots in the black - after a bit of practice and some tweaking of the sight...
View attachment 537504
If if get one of those stocks I’d be tempted to leave the front sight as is and use the stock for only for much longer ranges
Upvote 0
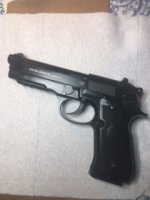
I've thought about getting a Beretta 92 for a while now and have heard that the Umarex M92A1 BB gun does a good job of simulating the feel and function of the real thing. Figured I'll try the BB gun first.
The Good ...
All metal. Heavy, solid, and well balanced.
Indeed it feels much like the real 92, and one of the most comfortable guns I've ever held.
Several hundred shots so far and not one jam or double-feed.

The Bad ...
Magazine is not the easiest to load. The mag follower tab is too short, a small tool helps pull it down. Fortunately it can lock in place while you're loading. A few extra mags spaces out the reloading.
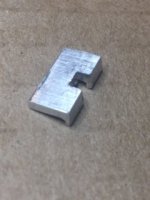
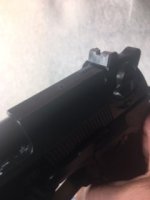
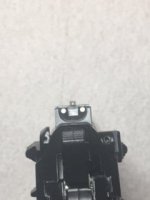
Sights are way off and not adjustable. It shoots too low. There are all sorts of suggestions how to fix this, but I figured the easiest thing was to make a rear sight mask and afix it to the rear sight. Shown below, it adds 0.030" to the height of the rear sight, and the notch is much shallower than the one in the existing sight. Of course, the rear dots no longer line up with the front dot as before but that's ok.
Problem solved.
I tipped the barrel up a little simply to show all three dots, the front dot will be partially obscured by the mask in actual use. Still need to paint the mask black.


The Unusual ...
There's a switch for semi-auto or full-auto. Granted, full-auto will burn through gas and ammo much quicker and probably wear the whole thing out sooner, but I have to admit it's a lot of fun. Note to self ... use sparingly.
In Summary ...
Accuracy is on a par with any of these bb pistols that run around 300fps, one cannot expect it to compete for accuracy with its pellet gun version that comes with a proper rifled barrel. And that's ok, this is expected.
I ran a few mags through it to verify proper functionality, then promptly field stripped it for a thorough lube. Runs like a clock.
It's a beautiful handling thing.
I'm keeping this one.
The Good ...
All metal. Heavy, solid, and well balanced.
Indeed it feels much like the real 92, and one of the most comfortable guns I've ever held.
Several hundred shots so far and not one jam or double-feed.

The Bad ...
Magazine is not the easiest to load. The mag follower tab is too short, a small tool helps pull it down. Fortunately it can lock in place while you're loading. A few extra mags spaces out the reloading.
Sights are way off and not adjustable. It shoots too low. There are all sorts of suggestions how to fix this, but I figured the easiest thing was to make a rear sight mask and afix it to the rear sight. Shown below, it adds 0.030" to the height of the rear sight, and the notch is much shallower than the one in the existing sight. Of course, the rear dots no longer line up with the front dot as before but that's ok.
Problem solved.
I tipped the barrel up a little simply to show all three dots, the front dot will be partially obscured by the mask in actual use. Still need to paint the mask black.


The Unusual ...
There's a switch for semi-auto or full-auto. Granted, full-auto will burn through gas and ammo much quicker and probably wear the whole thing out sooner, but I have to admit it's a lot of fun. Note to self ... use sparingly.
In Summary ...
Accuracy is on a par with any of these bb pistols that run around 300fps, one cannot expect it to compete for accuracy with its pellet gun version that comes with a proper rifled barrel. And that's ok, this is expected.
I ran a few mags through it to verify proper functionality, then promptly field stripped it for a thorough lube. Runs like a clock.
It's a beautiful handling thing.
I'm keeping this one.
Last edited:
Upvote 0
Hmm, for some reason the pictures came out a bit blurry. I guess it loses resolution when posting a small picture instead of a medium one, because they’re all quite clear on my phone.I've thought about getting a Beretta 92 for a while now and have heard that the Umarex M92A1 BB gun does a good job of simulating the feel and function of the real thing. Figured I'll try the BB gun first.
The Good ...
All metal. Heavy, solid, and well balanced.
Indeed it feels much like the real 92, and one of the most comfortable guns I've ever held.
Several hundred shots so far and not one jam or double-feed.
View attachment 538107
The Bad ...
Magazine is not the easiest to load. The mag follower tab is too short, a small tool helps pull it down. Fortunately it can lock in place while you're loading. A few extra mags spaces out the reloading.
Sights are way off and not adjustable. It shoots too low. There are all sorts of suggestions how to fix this, but I figured the easiest thing was to make a rear sight mask and afix it to the rear sight. Shown below, it adds 0.030" to the height of the rear sight, and the notch is much shallower than the one in the existing sight. Of course, the rear dots no longer line up with the front dot as before but that's ok.
Problem solved.
I tipped the barrel up a little simply to show all three dots, the front dot will be partially obscured by the mask in actual use. Still need to paint the mask black.
View attachment 538108View attachment 538110View attachment 538109
The Unusual ...
There's a switch for semi-auto or full-auto. Granted, full-auto will burn through gas and ammo much quicker and probably wear the whole thing out sooner, but I have to admit it's a lot of fun. Note to self ... use sparingly.
In Summary ...
Accuracy is on a par with any of these bb pistols that run around 300fps, one cannot expect it to compete for accuracy with its pellet gun version that comes with a proper rifled barrel. And that's ok, this is expected.
I ran a few mags through it to verify proper functionality, then promptly field stripped it for a thorough lube. Runs like a clock.
It's a beautiful handling thing.
I'm keeping this one.
Upvote 0
Or mount a scope on its generous rail.There’s a nice folding stock made for these. I understand it requires a different front sight be used as it drastically changes the HW45’s kick and causes the gun to shoot high (?).
If if get one of those stocks I’d be tempted to leave the front sight as is and use the stock for only for much longer ranges
Upvote 0
I really have a soft spot for pistols, I have a bunch...Had some time and saw a thread about the HW70. Really a great gun but not that accurate in my experience. Decided to do a death match against my Tempest, my only two springer air pistols...The very first shot from the Tempest was great so I had to take a picture. All were off hand, a rested shot with a springer pistol is not helpful for me, the POI changes too much. I also pitted my Smith and Wesson 79G (.177) against the 78G. 10 shots at each bull. The top targets for the CO2 pistols are rested. All shots were from 15 ft in my garage. Please do not disparage my off-hand skills, I am very sensitive  .
.


Upvote 0
And for comparison, I shot both of my most accurate pistols, Baikal 46M and Crosman 1701P, both with Rink grips...Also 10 shots at each bull.

Upvote 0
My first springer was a Tempest. My second springer was an HW70. I still have the HW70, but the Tempest only had coke can accuracy so it was sold. The HW can shoot shot shell hulls at 25 yards.I really have a soft spot for pistols, I have a bunch...Had some time and saw a thread about the HW70. Really a great gun but not that accurate in my experience. Decided to do a death match against my Tempest, my only two springer air pistols...The very first shot from the Tempest was great so I had to take a picture. All were off hand, a rested shot with a springer pistol is not helpful for me, the POI changes too much. I also pitted my Smith and Wesson 79G (.177) against the 78G. 10 shots at each bull. The top targets for the CO2 pistols are rested. All shots were from 15 ft in my garage. Please do not disparage my off-hand skills, I am very sensitive.
View attachment 539247View attachment 539248
Upvote 0
Tried out my rebuilt Birmingham made 0.177 Webley Tempest today at 10m.
Even with the rear sight at its lowest position, it was shooting high, so it took quite a bit of effort to get ten shots in the black.
A bit of sight tweaking required...

Even with the rear sight at its lowest position, it was shooting high, so it took quite a bit of effort to get ten shots in the black.
A bit of sight tweaking required...
Upvote 0
Well thanks Pyramyd, I bought their Pkg. deal Umarex SA10. I'll just say yuck, back it goes, it does not group at all. It also was by guess and by golly with feeding pellets. Neat design tho. I'll need to check out that mp40 I do like full auto and the Blitz is a bit too much at times.
I must say I really like my Beeman 2028 pistol. I would like a simple wire folding shoulder "stock" ideally added on to it's handsome and comfy wood stock. Accurate, powerful and loud as all get out, a Buck rail moderator and adapter fixed that. What I dislike is it is darn near a carbine with the barrel length and moderator. I'm seeing about 850 FPS with CPHP's a powerful pistol and quite accurate. The magazine system works well and plays nice with scopes. It has an 11 mm rail so get the right rings if you scope it. Great gun esp. for the money!
I must say I really like my Beeman 2028 pistol. I would like a simple wire folding shoulder "stock" ideally added on to it's handsome and comfy wood stock. Accurate, powerful and loud as all get out, a Buck rail moderator and adapter fixed that. What I dislike is it is darn near a carbine with the barrel length and moderator. I'm seeing about 850 FPS with CPHP's a powerful pistol and quite accurate. The magazine system works well and plays nice with scopes. It has an 11 mm rail so get the right rings if you scope it. Great gun esp. for the money!
Upvote 0
I’m pretty happy with the MP40. Solid construction, pretty accurate, and rate of fire isn’t overly fast. I did have a failure early on when a dowel pin in the trigger group broke, and the fix was to replace it with a proper hardened dowel pin from the local hardware store. No problems since.Well thanks Pyramyd, I bought their Pkg. deal Umarex SA10. I'll just say yuck, back it goes, it does not group at all. It also was by guess and by golly with feeding pellets. Neat design tho. I'll need to check out that mp40 I do like full auto and the Blitz is a bit too much at times.
I must say I really like my Beeman 2028 pistol. I would like a simple wire folding shoulder "stock" ideally added on to it's handsome and comfy wood stock. Accurate, powerful and loud as all get out, a Buck rail moderator and adapter fixed that. What I dislike is it is darn near a carbine with the barrel length and moderator. I'm seeing about 850 FPS with CPHP's a powerful pistol and quite accurate. The magazine system works well and plays nice with scopes. It has an 11 mm rail so get the right rings if you scope it. Great gun esp. for the money!
Upvote 0